Slinky tutorial
This tutorial is designed to introduce you to the Maya Plugin, the Desktop App, and the Workflow API. We'll get the Slinky demo scene up and running, and ready to send a job to the Workflow API. In fact it's there already, but we'll go through the steps and explain the scene.
Audience
This tutorial is geared towards TDs and programmers who are familiar with Maya and Python. It will cover the workings of a template and give you an understanding of the tools to set up powerful cloud compute jobs for artists.
This tutorial is based around the following software versions. However, if more recent versions are available, you should use them.
| Software | Version |
|---|---|
| Maya submitter plugin | cwmaya 0.0.1-beta.20 |
| Desktop app | cioapp 0.4.4 |
Install the Maya plugin
pip3 install --upgrade cwmaya --pre --target=$HOME/CoreWeave/maya
python3 $HOME/CoreWeave/maya/cwmaya/post_install.pyIf you are a developer, you may want to install from GitHub so that you can make modifications. See the How-to page for more information.
Make sure you can load the plugin in the Maya Plugin Manager. If if fails to load, it may be due to having the legacy Conductor Maya submitter Conductor.py set up to auto-load. It uses a version of Conductor Core that is incompatible with the new system.
Desktop App
Install the Desktop app. Try a binary release.
Some newer Mac architectures may have poroblems. On my M1 Mac, Conductor_<version>_x64.dmg worked. If you have trouble, you may need to build from source, which is easy. Follow the instructions in the How-to page.
Make sure you can run the app.
Get the demo scene
- Go to the cwmaya releases page and download the latest version of the
example_projectsfolder. It should be the same version as the Maya plugin you installed. - Unzip the folder and put it in a location of your choice. You'll notice it contains a project called
siggraph. This is the project we'll be using. - Open Maya and Set Project to the
siggraphproject. - Open the file
slinky.main thescenesdirectory.
The Storm Window
The Storm Window is where we set up the job. Go to the CoreWeave menu and choose Storm Window.
This window opens with a template loaded that is designed for jobs where you want to run simulation, render it, and finally composite the results of the render. This is why there are tabs representing those operations. A different type of job might have different tabs.
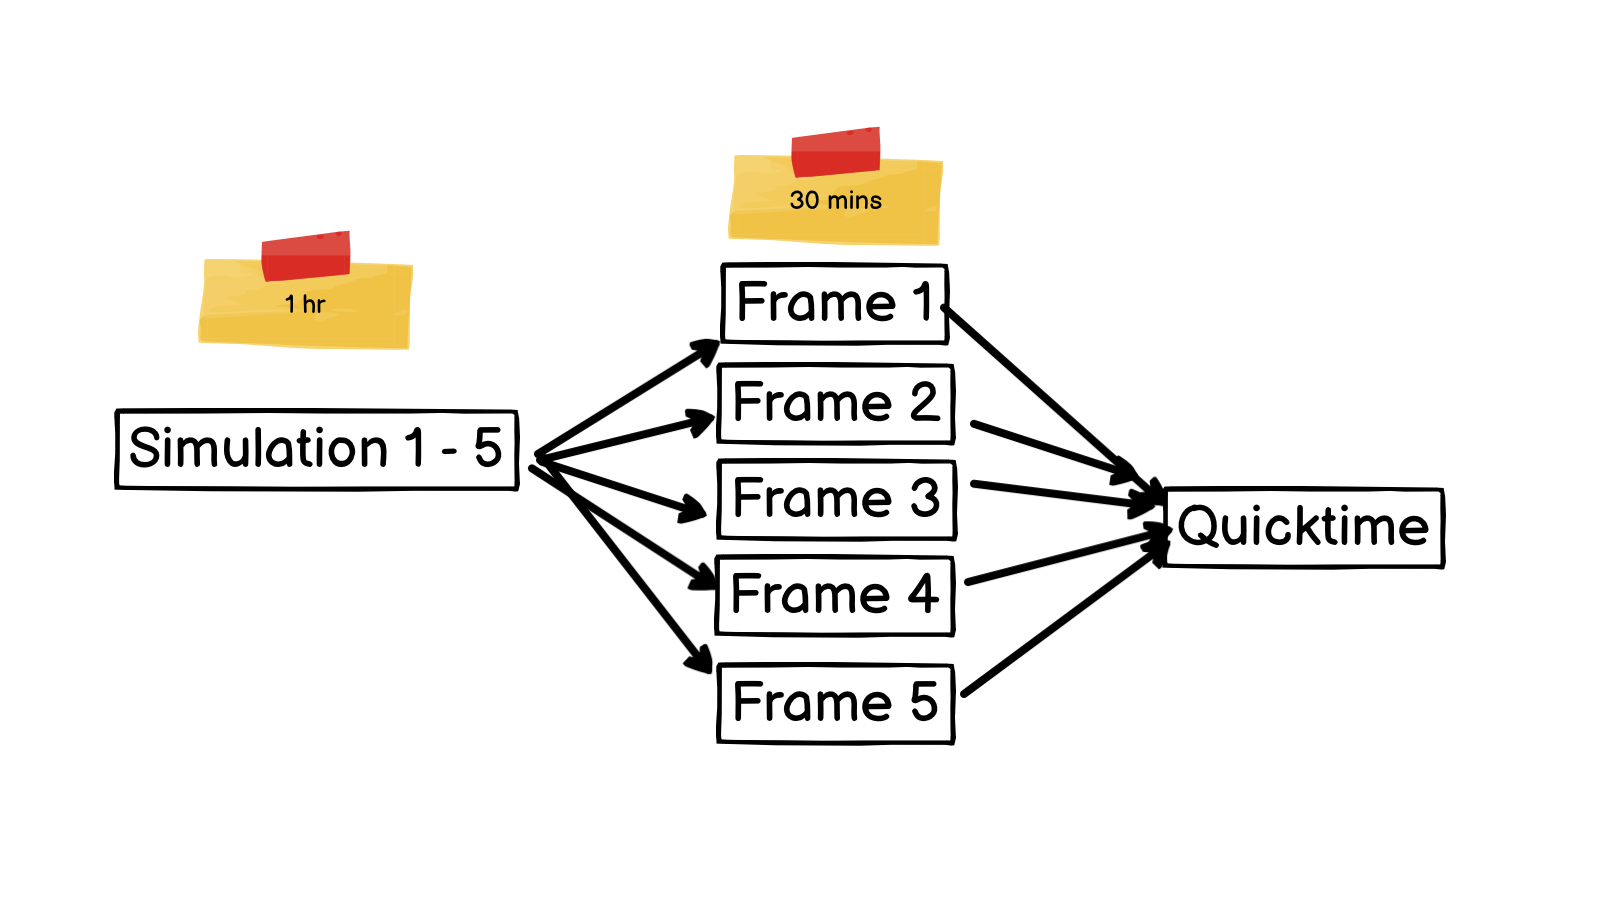
The graph that this template creates, contains a simulation node, several render nodes, and a compositing node.
- The simulation node runs the sim and writes out cache files. It must run on one machine since every frame depends on the previous frame.
- The frame renders may take a long time, but fortunately they can run in parallel.
- The compositing node must wait for all the renders to finish.
These dependencies are illustrated below.
Send to composer
You can also see the structure laid out by sending the job to the Graph Composer in the desktop app. At the bottom of the window you'll see the Send to Composer button. Go ahead and hit the button now.
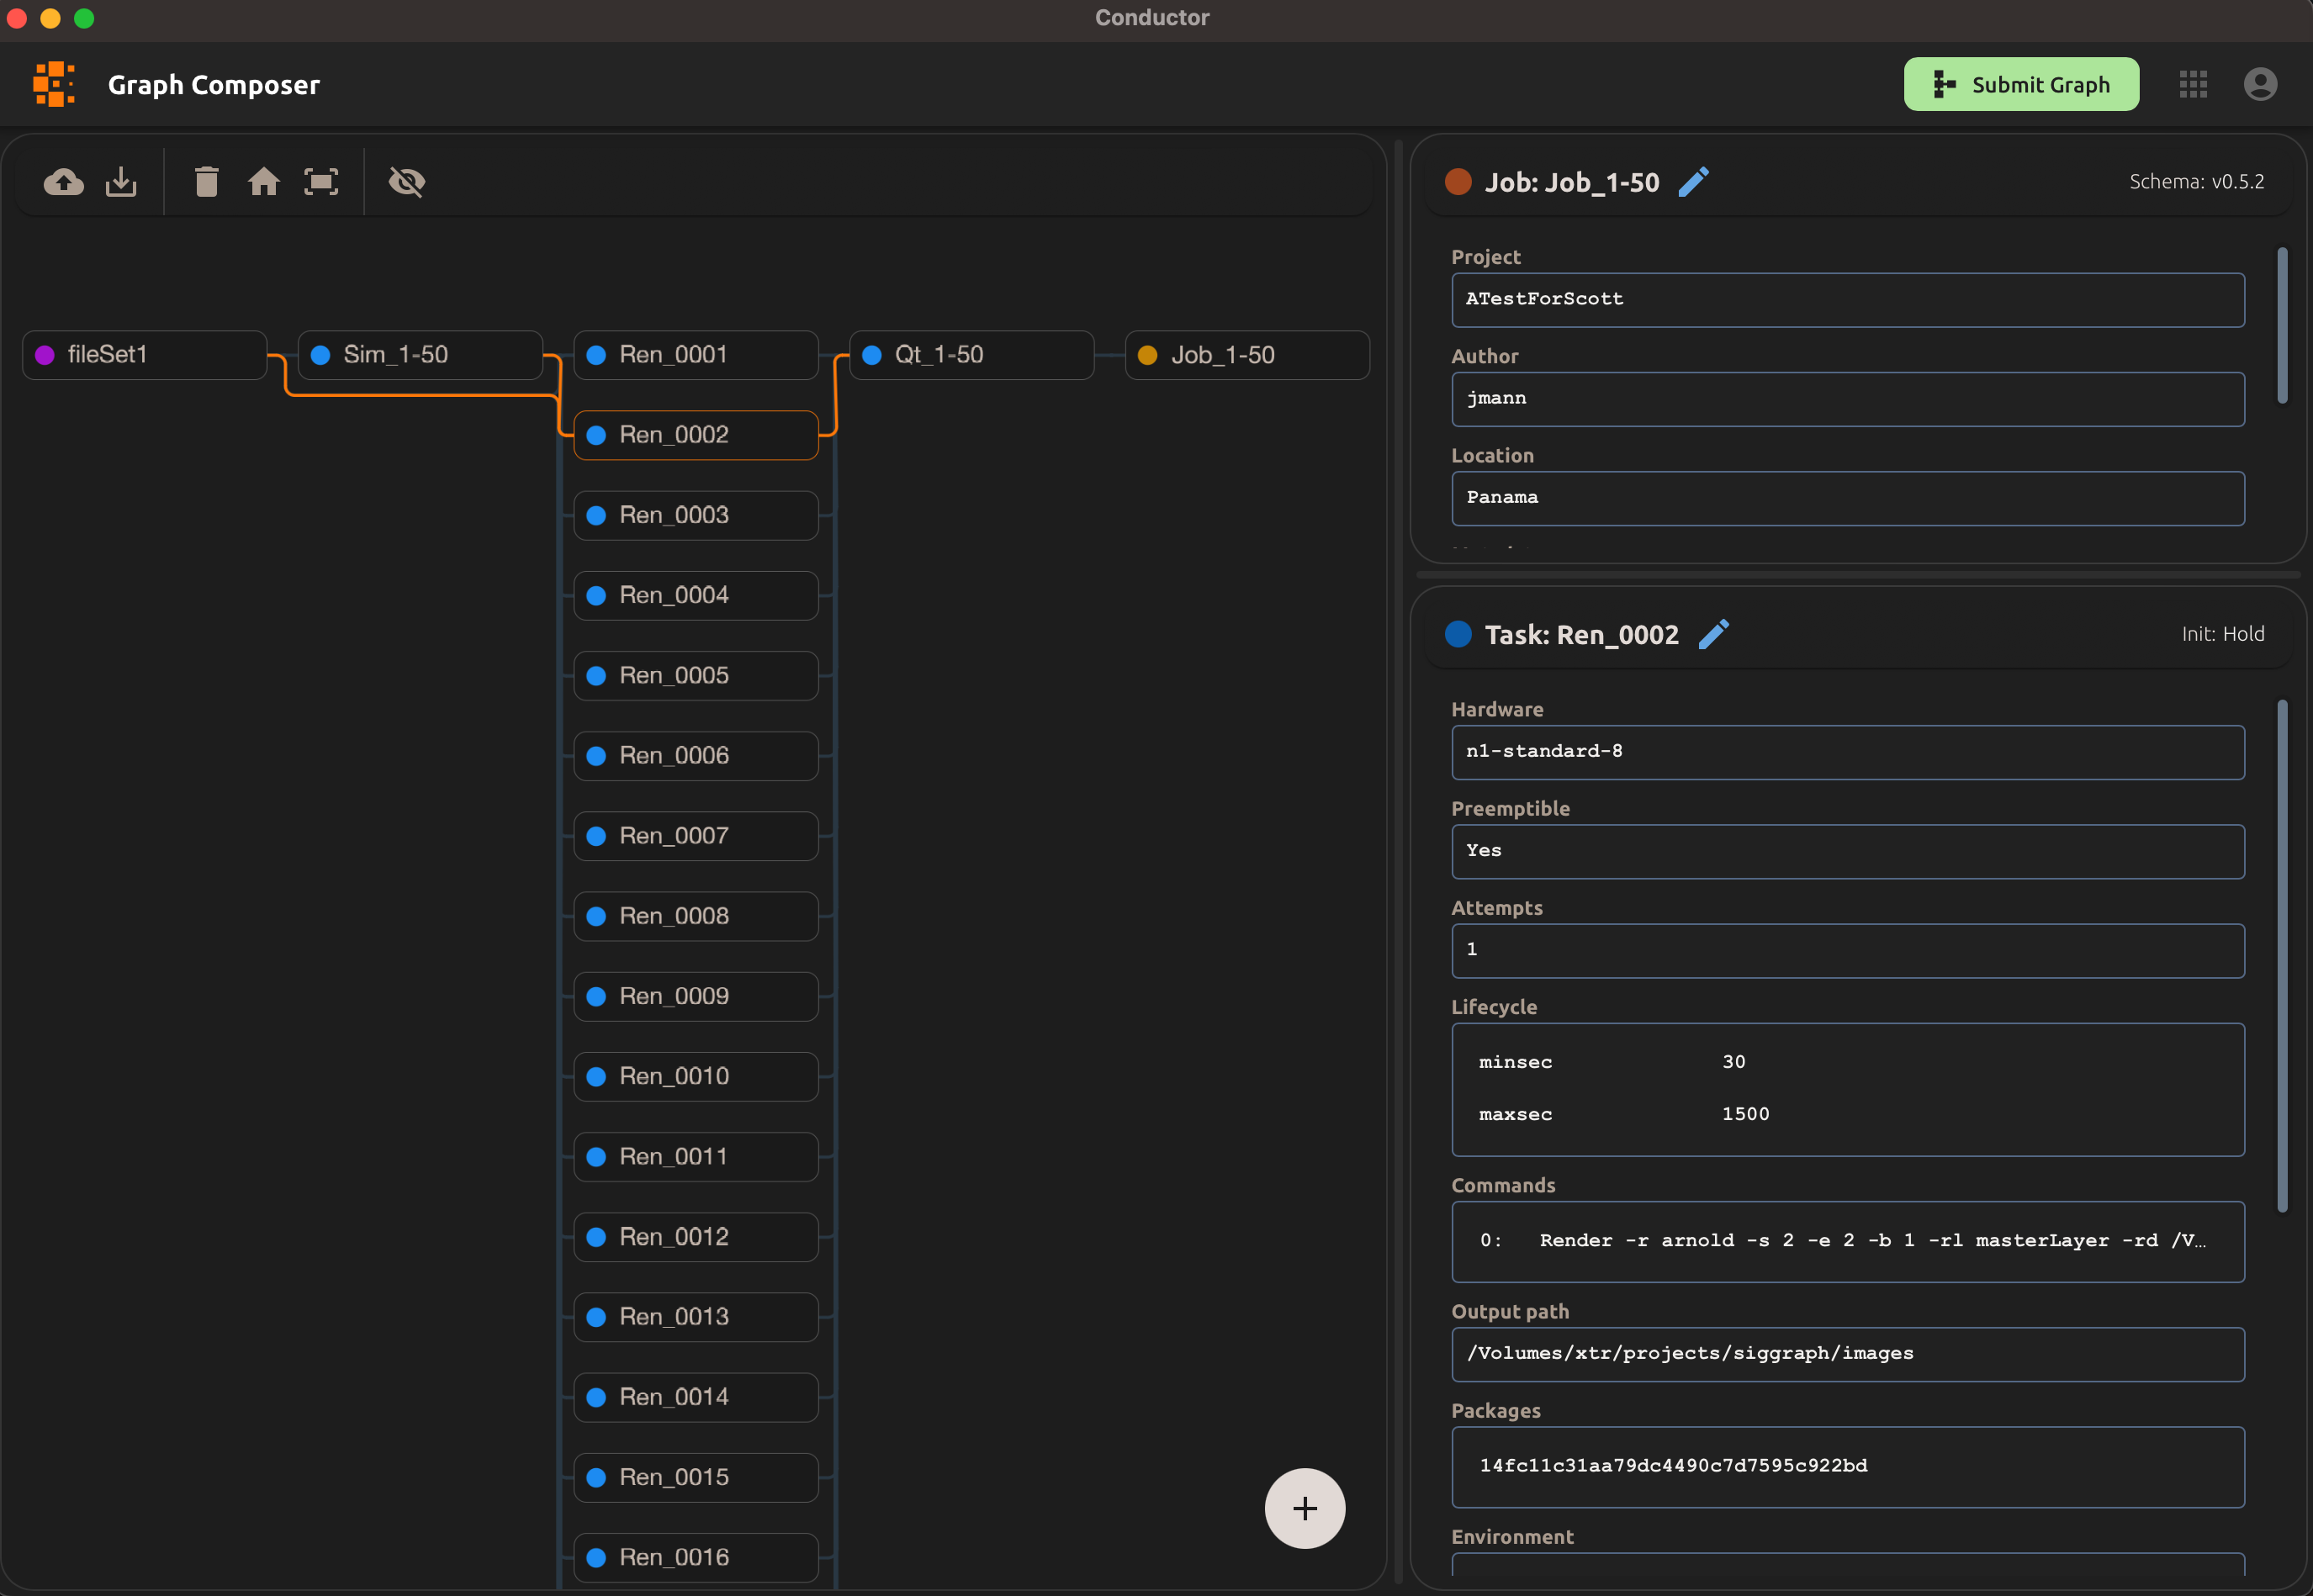
if you installed the desktop app earlier, it should open now and auto-navigate to the Composer view with the generated job visible.
- If the desktop app didn't open, open it now manually and try the "Send to Composer" button again.
- If it opened but didn't navigate to the Composer view, click on the Graph Composer button on the main page to navigate there.
- In either case, please report the unexpected bahavior to the team.
You can send the job to the composer at any time to check the structure. Now let's head back to Maya.
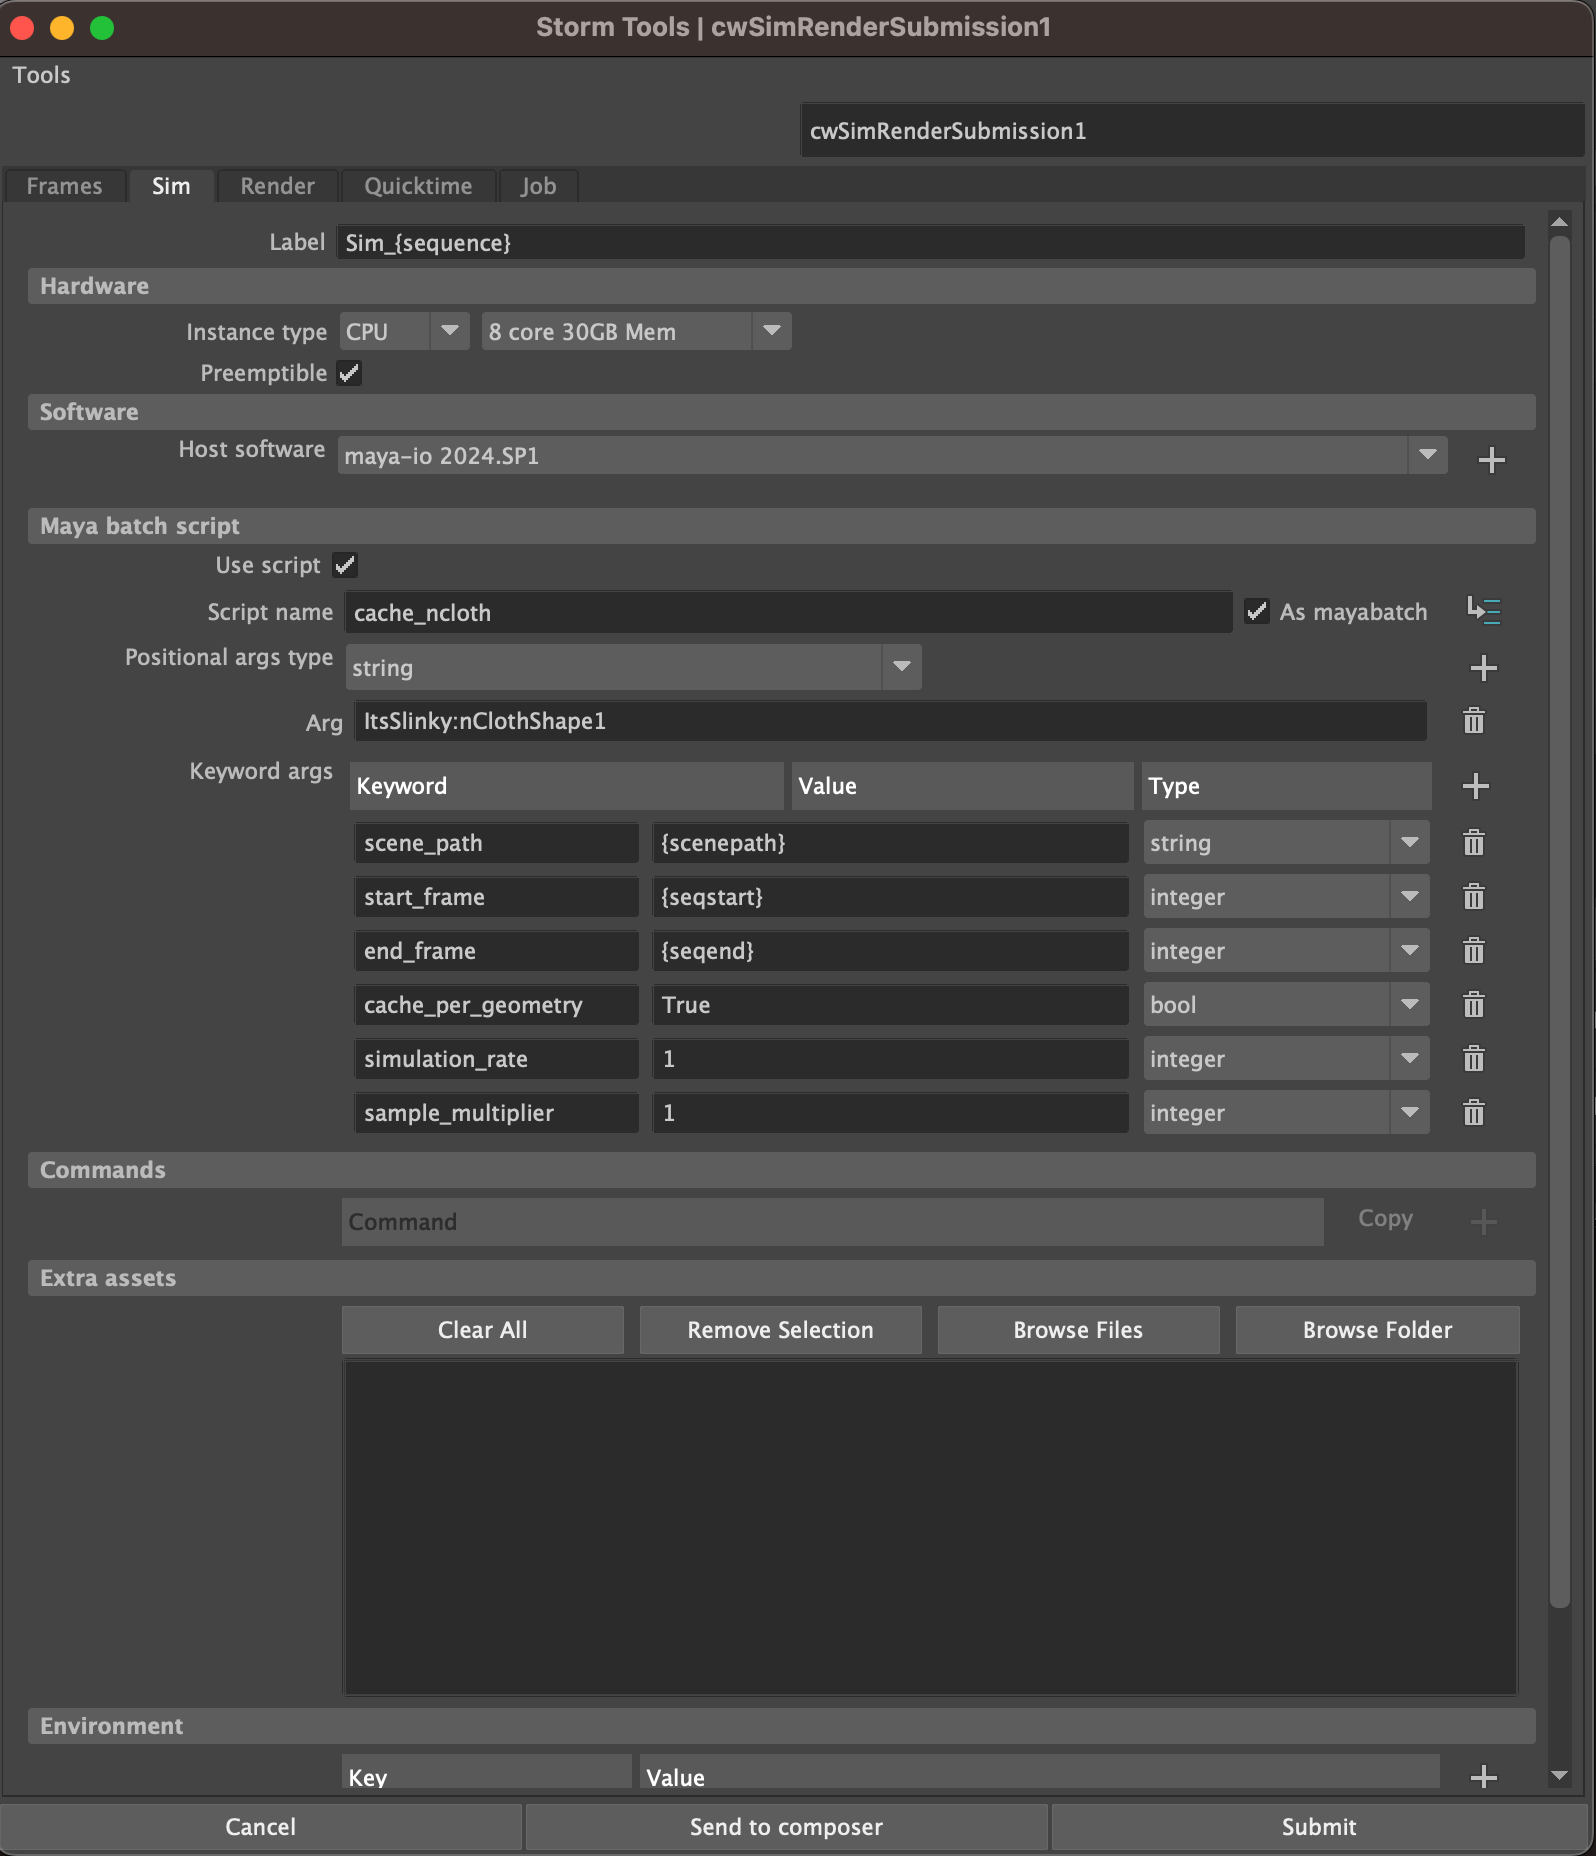
Configure the Sim task
We need to configure each of these task types in the template, starting with the Simulation tab. If you are not already on the Sim tab, switch now.
Tokens
The first thing to notice is the Label attribute: Sim_{sequence}. Tokens in braces are resolved by the system in the context of a set of variables. The {sequence} token describes the sequence of frame numbers for the job. It is generated based on settings in the Frames tab. To see the full list of available tokens, go to:
Tools -> Show spec tokens.
Hardware and Software
These sections should be familiar. There are some minor differences to existing submitters with how software choice is handled. For example, it's okay to have no software defined. Leave it at Maya2024 for now, and since we are not rendering, we don't need to add renderers.
Maya batch script
To have a task run a simulation, we need it to run a script, and to do that we can use the mayabatch command-line. Maya batch mode allows you to specify a MEL script to run, but it does not support Python scripts. Since most developers like to stay in Python these days, we provide a mechanism to allow you to construct a Python conmmand with a versatile function signature, cmd(*args, **kwargs), wrap it in a MEL script, and run it with mayabatch. The alternative would be to use the commands widget, but this specialized script UI avoids the need to deal with several layers of escape characters.
The provided script is a Python script called cache_ncloth.py. It lives in a maya module called storm_remote that comes with the cwmaya plugin, and it will be uploaded and made available to the job in the cloud. For this reason, you do not need to specify the full path to the script, just the name.
cache_ncloth.py does the following:
- Opens the scene file.
- Caches one or more nCloth objects and saves the cache files to disk.
- Creates cache reader nodes in the Maya scene and hooks them up.
- Saves the new (cached) scene in a writable location.
The script arguments may make use of tokens. In this case, the *args are the names of objects to be cached, and the **kwargs specify how the caching should be done. While all the kwargs have defaults, you'll want to make sure that the frame range args reference the actual sequence range, and that it knows where to get the scene file from.
You must specify the types of args and kwargs so that we know how to construct the full commandline string.
It should be evident that this UI facilitates the construction of any mayabatch command you might need to run a simulation, or any other task.
Clipboard
The little button to the right of the script name field will copy the resolved command-line to the clipboard. Here's what it looks like:
MAYA_MODULE_PATH='/Users/jmann/CoreWeave/maya/storm_remote' mayabatch -proj "/Volumes/xtr/projects/siggraph" -command "python("import cache_ncloth;cache_ncloth.doit('ItsSlinky:nClothShape1', scene_path='/Volumes/xtr/projects/siggraph/scenes/slinky.ma', start_frame=1, end_frame=50, cache_per_geometry=True, simulation_rate=1, sample_multiplier=1)")"This is useful for debugging and for testing the command locally. For your convenience, it prefixes the command with the MAYA_MODULE_PATH pointing to the storm_remote module mentioned earlier, which is necessary for the script to be found by Maya.
In other words the command is ready to paste into a terminal and run. Go ahead and try it now. If everything is working you'll see cache files appear in the folder storm/cache in the project directory.
commands
The commands widget is a place to put less complicated commands. If you choose not to use a mayabatch script, you can put shell commands here instead.
Extra assets
The simulation only needs the scene file and the caching script, both of which are automatically scraped. Therefore no files need to be added to the Extra assets section.
Extra environment variables
Likewise, the only environment variable needed is the MAYA_MODULE_PATH, which is set automatically.
Output path
The output path is set to {mayaprojdir}/storm. This folder is the designated writable folder for the task. Cache files and the cached scene file are written to subfolders here and will be accessible by tasks that are connected downstream of the Sim task.
Configure the Render tasks
By now you should be confident that the simulation task is going to produce a cached cloth scene. The render tasks will need to read this scene and render it. Switch to the Render tab now.
Again, it's worth noting the Label attribute: Ren_{start:>04}. Since this tab in the template generates several render tasks, we want to use a label that is unique for each task. start is the token for the start of the current chunk. {start:>04} shows how the token can be modified with Python fstring syntax. In this case it pads the frame number with zeros to four digits.
Software
We are rendering with Maya, so set the software to Maya2024.
Commands
We don't provide the convenience of a mayabatch script widget here because the Render command is a straightforward shell command. Notice the extensive use of tokens in the command. This helps to keep the scene portable.
Render -r arnold -s {start} -e {end} -b {step} -rl masterLayer -rd "{imagesdir}" -proj "{mayaprojdir}" "{mayaprojdir}/storm/scenes/{scenename}.ma"Similar to the mayabatch script, you can copy the resolved command to the clipboard and run it in a terminal. This command will render the frames specified in the Frames tab, using the Arnold renderer, and output the images to the {imagesdir} folder. The scene file is the cached scene produced by the simulation task. You may want to change the range and step just to quickly test that it renders something.
Extra assets
The render task needs the cached scene file, and the cache files produced by the simulation task. However, we don't need to scrape these or specify them because the requirement on those assets is implied by the fact that they were generated by tasks that are inputs to the render tasks. Any task always has access to the output files of its input tasks.
We do however need to specify texture assets. The scene uses an hdri image and an image called alcazar.jpg. We don't yet scrape assets, so go ahead and browse for these files in the sourceimages folder. You can clear out all the other entries in the list first.
Output path
The output path is set to {imagesdir}. This is the designated writable folder for the task. Notice how it's different than the output folder for the simulation task.
Configure the Comp task
The comp task for this template is currently called Quicktime. The idea is that depends on all the render outputs, and when they are ready it uses them to make a movie.
Switch to the Comp (Quicktime) tab now.
You can see there are 2 commands. They'll run one after the other in the same task. The first command makes the folder expected by the second command. The second command uses ffmpeg to make a movie from the rendered frames.
These are the recommended commands for this task. (Don't use the stormdir token until it is fixed.)
mkdir -p  "{mayaprojdir}/storm/comp"
ffmpeg -framerate 24 -start_number 1  -i "{imagesdir}/out.%04d.exr" -vframes 40  -c:v libx264 -pix_fmt yuv420p  "{mayaprojdir}/storm/comp/output.mp4"
Note that it's currently hardcoded to make a 40 frame movie. You can change the start number and vframes arguments to use tokens representing the full range instead. Ir you may find you can omit them altogether.
You can test the comp task in the same way you tested the render task, by using the clipboard to copy the command and run it in a terminal.
The Job tab
The job node is a node in the graph, but it doesn't do any work. It serves as a container for the submission-wide settings, and it visually represents the final stage in the graph. When you see the job node go green in the monitor window, you know the job is complete.
Conclusion
This tutorial has covered the basics of setting up a job in the Maya plugin. You've seen how to set up a template, configure tasks, and send the job to the Desktop app for visualization. You've also seen how to test a simulation, test render the results, and test the comp task.
We haven't covered all the features of the plugin, and we havent submitted the graph to Conductor yet. We'll cover that in the next tutorial.