Working with nodes
Introduction
This document describes the practical side of working with nodes in the monitor view of the desktop app.
This howto is written while we are still in development. Screenshots and follow-along steps are based on an automatically loaded example workflow that does not run on a real backend. We instead provide some dev tools to help simulate real behavior.
If you want to follow along in the desktop app, the best way for now is to clone the repo and follow the installation instructions in the README. (Requires Rust, which is easy to install)
If you haven't done so already, please read the Statuses and History conceptual explanation. It will make this howto easier to follow.
Multi select
You can select nodes in the graph panel by clicking or dragging a box. You can only select nodes that are of the same type.
You can also use the selection filter to select nodes by matching their status, name, or other attributes.
Any time more than one node is selected, the last selected node is the one displayed in the Node Panel or the Edit node dialog.
If the last selected node is not the node whose parameters you want to see, you can use the shift key to deselect and reselect the desired node so that it becomes the last selected node.
This is similar to how Maya behaves when you select multiple nodes and view the Attribute Editor or the Channel box.
The Node Panel
The Node Panel->Attributes tab displays the attributes for the last selected node. It is read-only. It contains controls in its title bar that are relevant when one or more nodes are selected. We'll come to these later.
The Edit node dialog
Sometimes you'll submit a workflow and find that tasks or other nodes needs to be adjusted. Perhaps an environment variable has an incorrect value, a flag is missing from a command, or maybe a render failed because the instance type ran out of memory. In these cases you'll need to edit parameters for one or more nodes.
Parameters are not editable in the Attribute panel. Instead, you'll need to select one or more nodes and click the pencil icon in the title bar of the attributes panel to open the Edit node dialog.
We'll first look at the behavior when you edit nodes that have status open or holding.
For nodes that have started running already, or have finished, an edit is considered a retry. Retries are described later.
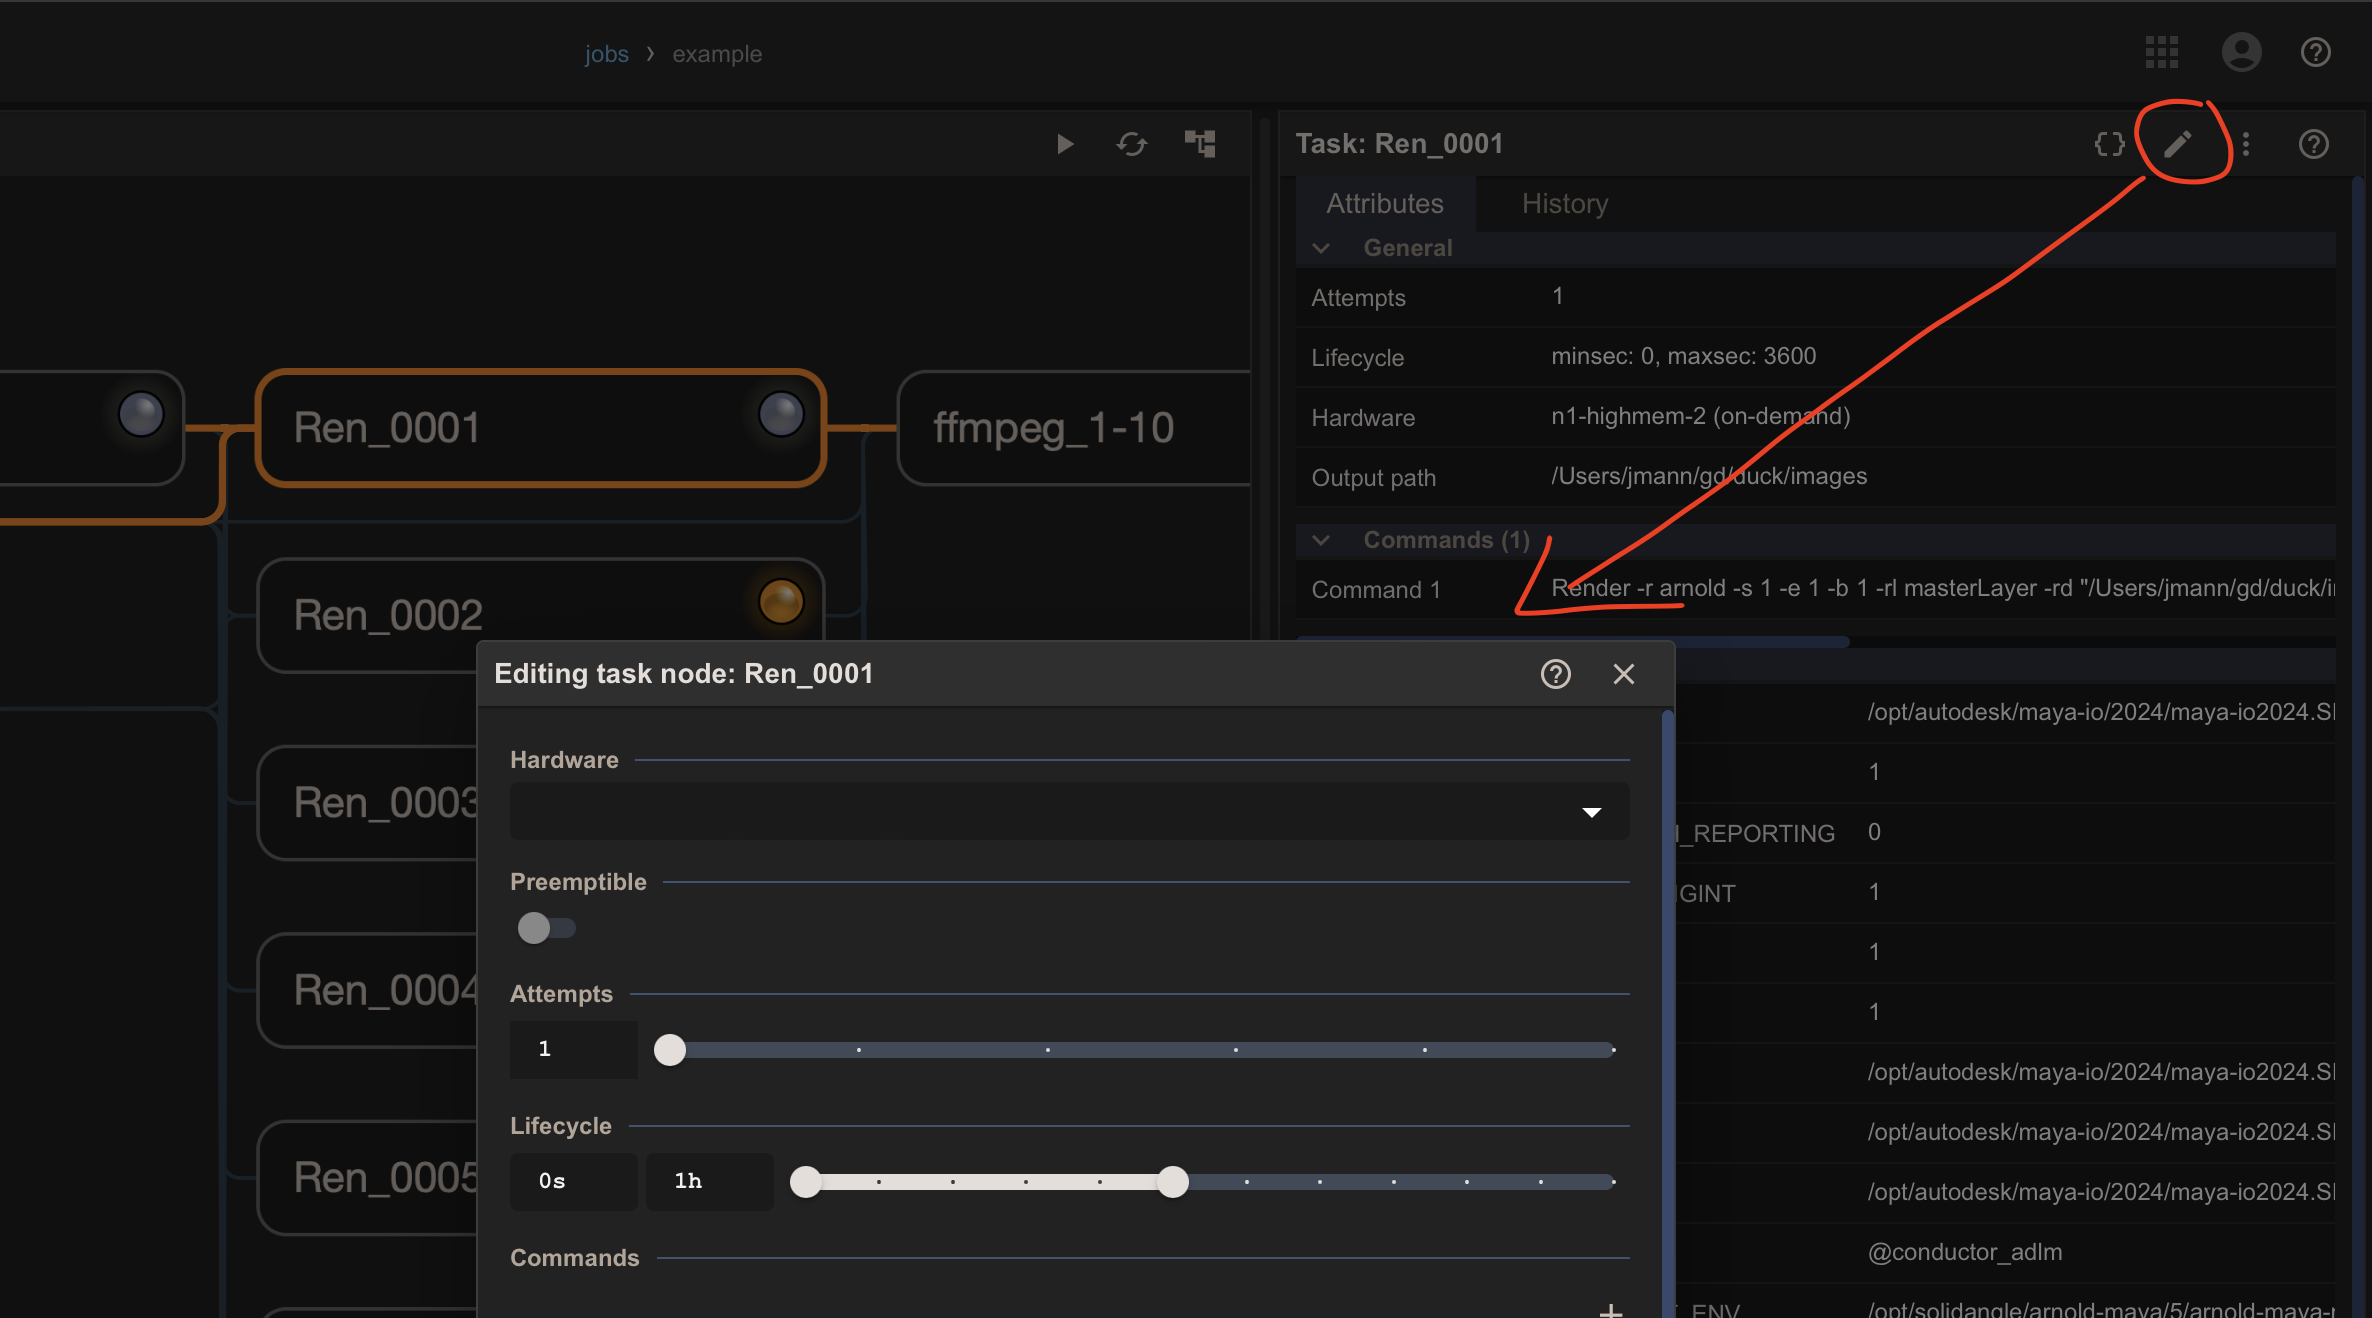
Single node and batch edit modes.
- If a single node is selected, the dialog will open showing all the editable parameters for that node.
- If multiple nodes are selected, the dialog will open in batch-edit mode, where you'll need to enable the attributes you want to edit. Your edits will be applied to all selected nodes and parameters that were not enabled will not be changed. This ensures that you don't propagate unwanted values, such as values that should vary for each selected node.
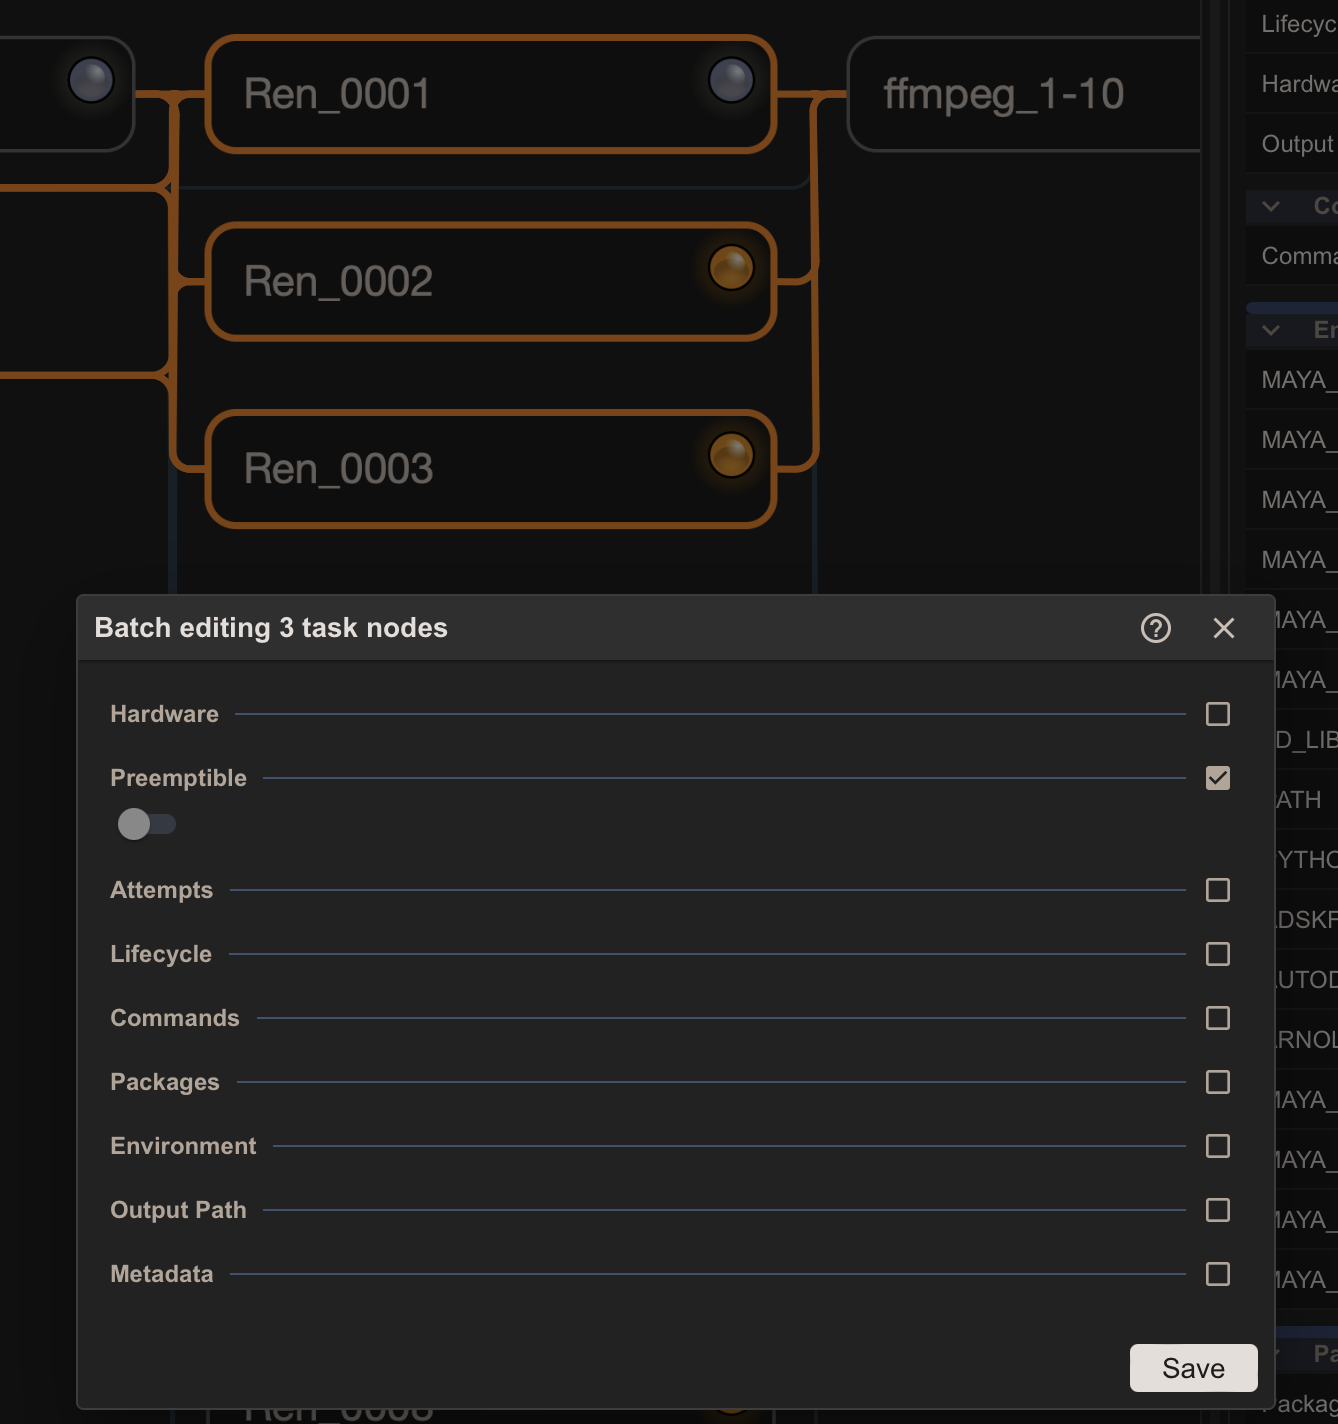
In the above example, the last selected node has its preemptible flag set to false. Set it to true and click Save.
Confirmation dialog.
You'll see a confirmation dialog.
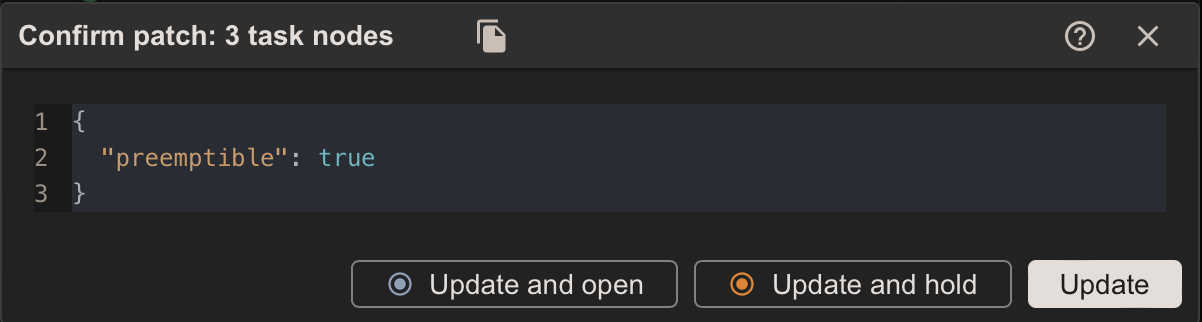
The confirmation dialog displays a patch of the parameters that will be changed. When you click Update the changes are applied to selected nodes.
For convenience, you also have the option to set the status to either holding or open at the same time.
In the above example, if you check the Attribute panel for the affected nodes individually you'll see they all have the preemptible flag set to true. Feel free to experiment with other parameters.
History panel
The Logs tab is irrelevant to this howto. It contains dummy data and is a placeholder to represent DCC logs.
Switch over to the history tab and you'll see the history of the last selected node.
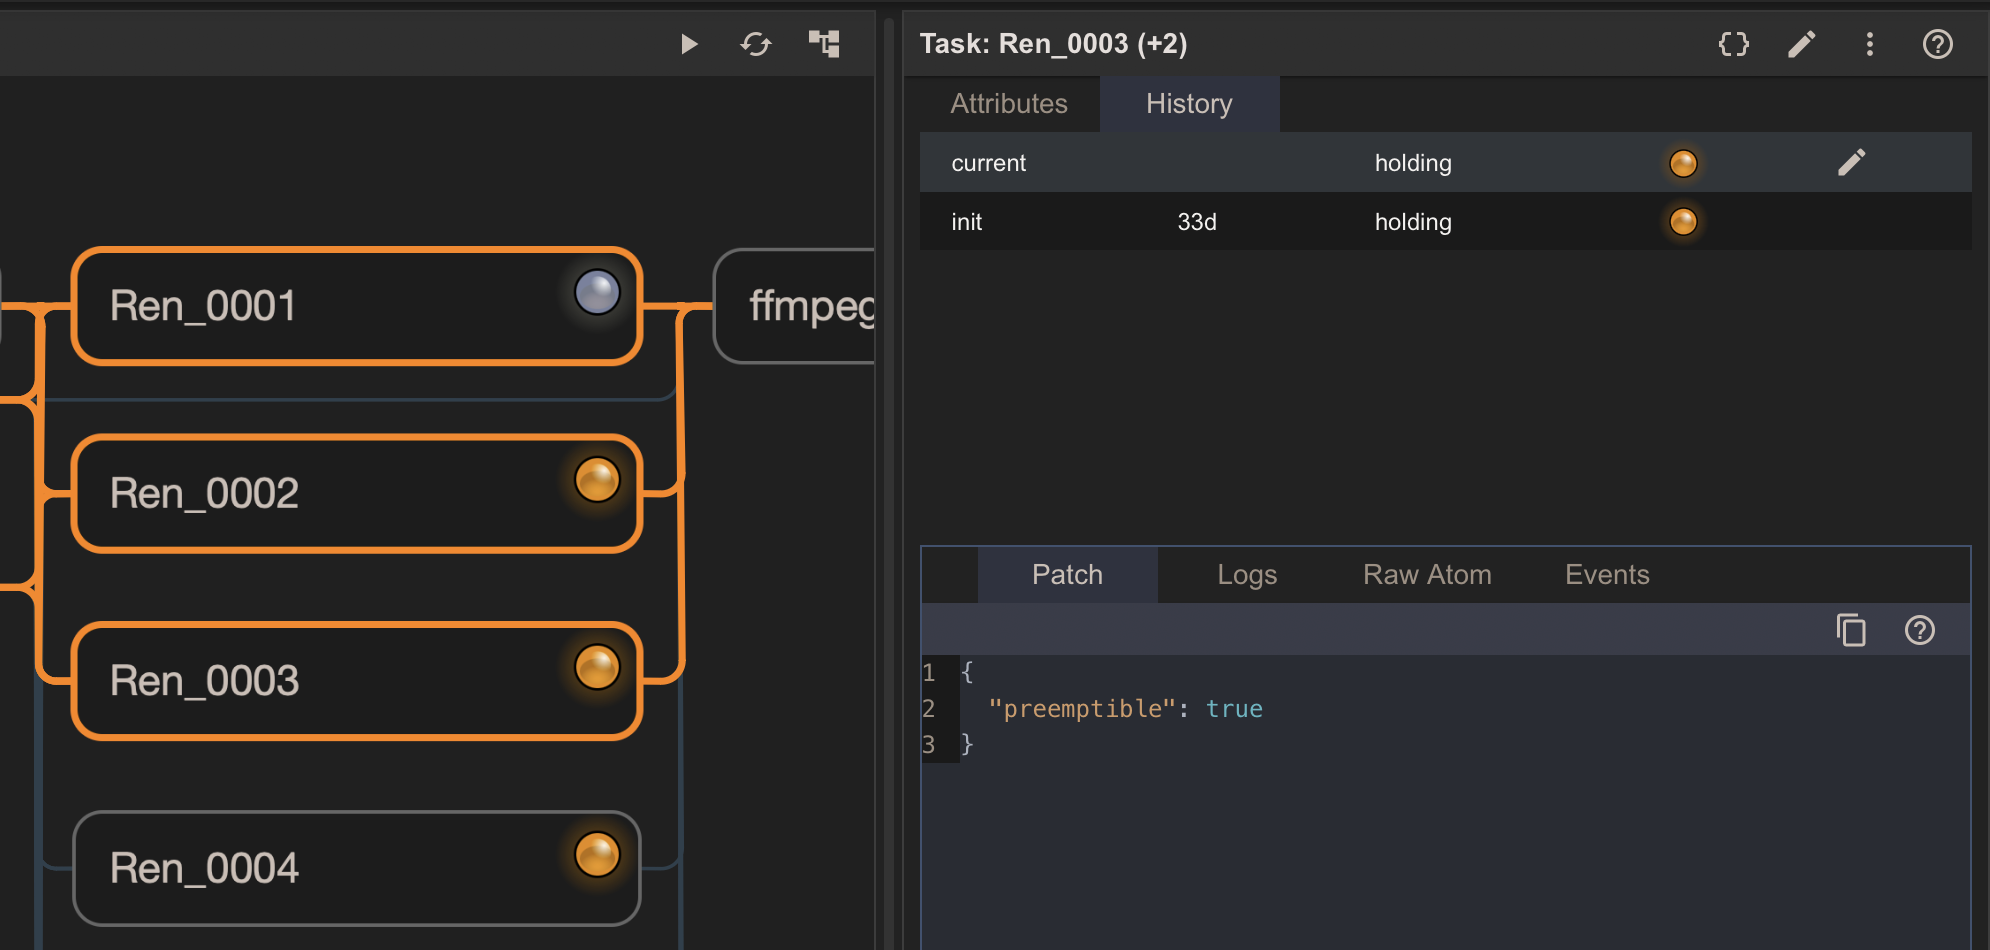
Referring back to the Statuses and History document, you'll see the top section shows the base configuration (init) and the current patch (current).
When you select either of them, you'll see its contents in the Patch tab in the bottom section.
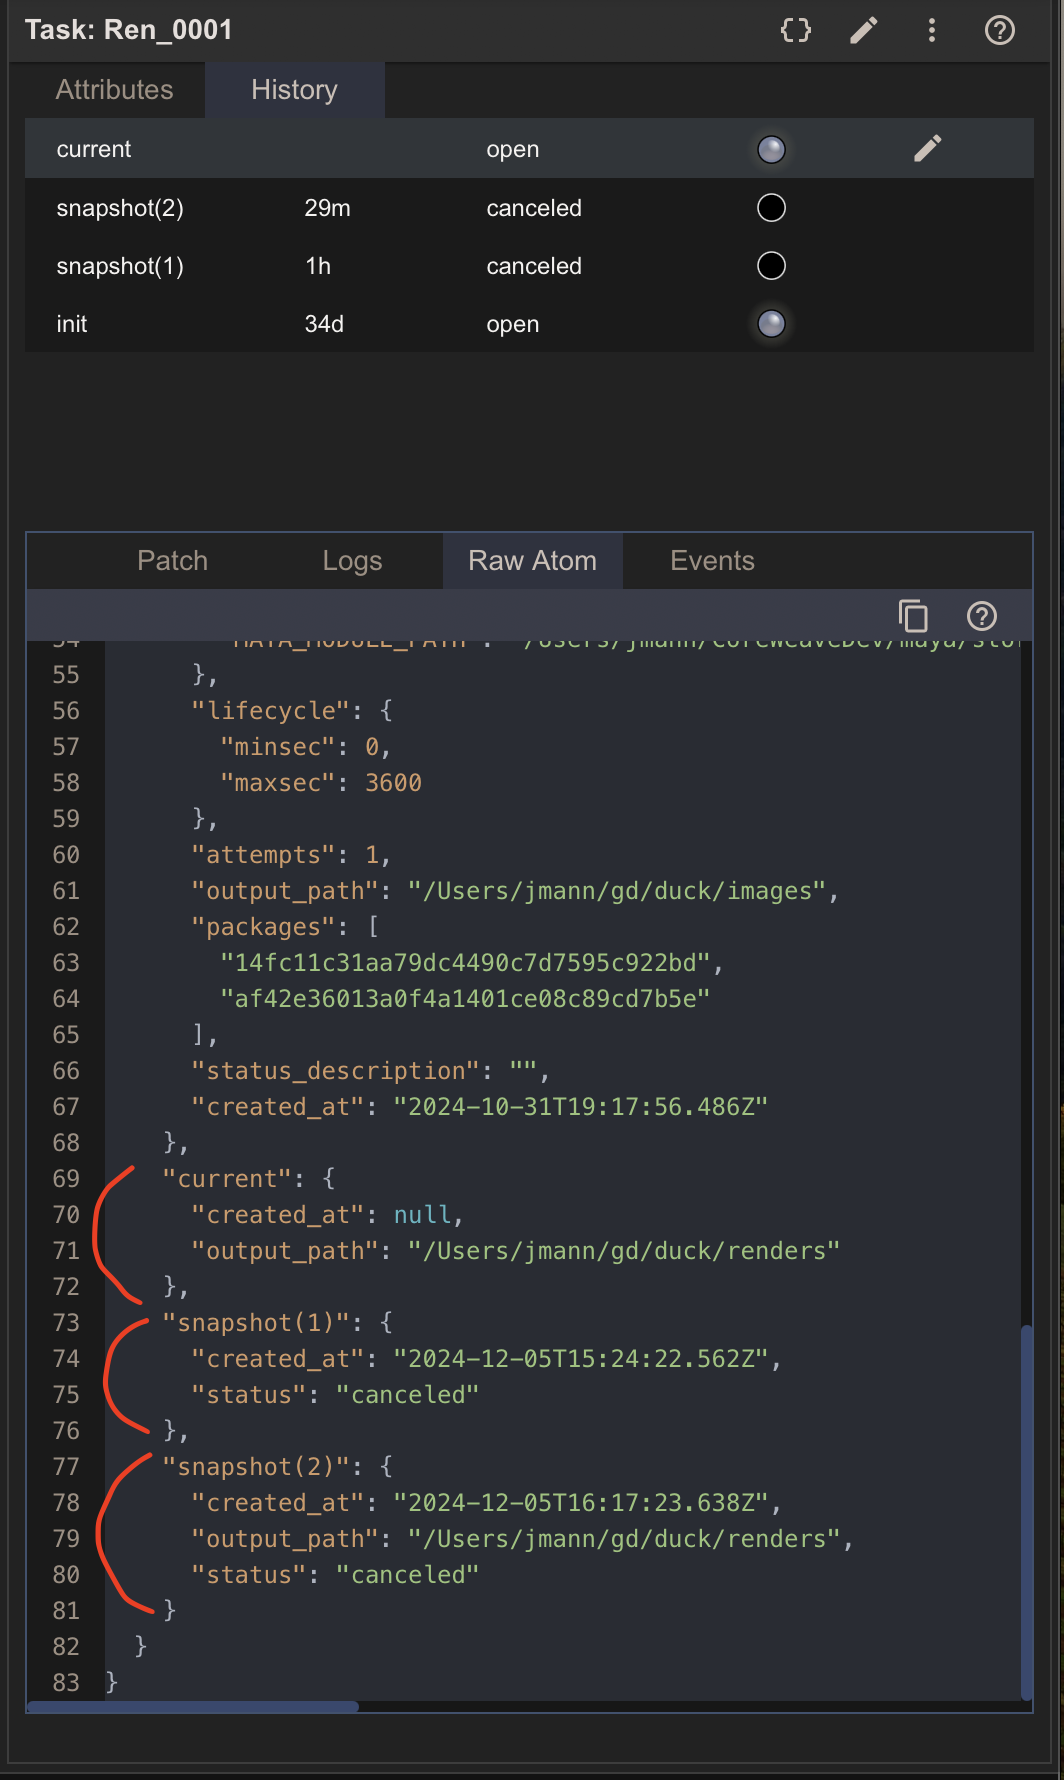
You can see the underlying structure for these configurations in the Raw Atom tab. They are both stored under the snapshots key in the atom.
Although these two configurations are not technically snapshots, it will become clear why they are structured as such when we learn about retries.
How to revert to the base configuration
- Select one or more of the nodes you edited.
- In the history panel select the init configuration. An edit pencil icon will appear.
- Click it to open the Edit node dialog, which will open prepopulated with the base configuration.
- If you have multiple nodes selected, the dialog will be in batch edit mode, in which case you'll need to enable the attributes you want to edit.
- Click Save to apply the changes.
There will soon be a simple set button for each configuration in the history panel. It will revert to that configuration without the need to open the edit node dialog.
Graph simulation
Several temporary features have have been added to help with development. In particular the ability to simulate graph evaluation on the default example graph is useful for understanding retries.
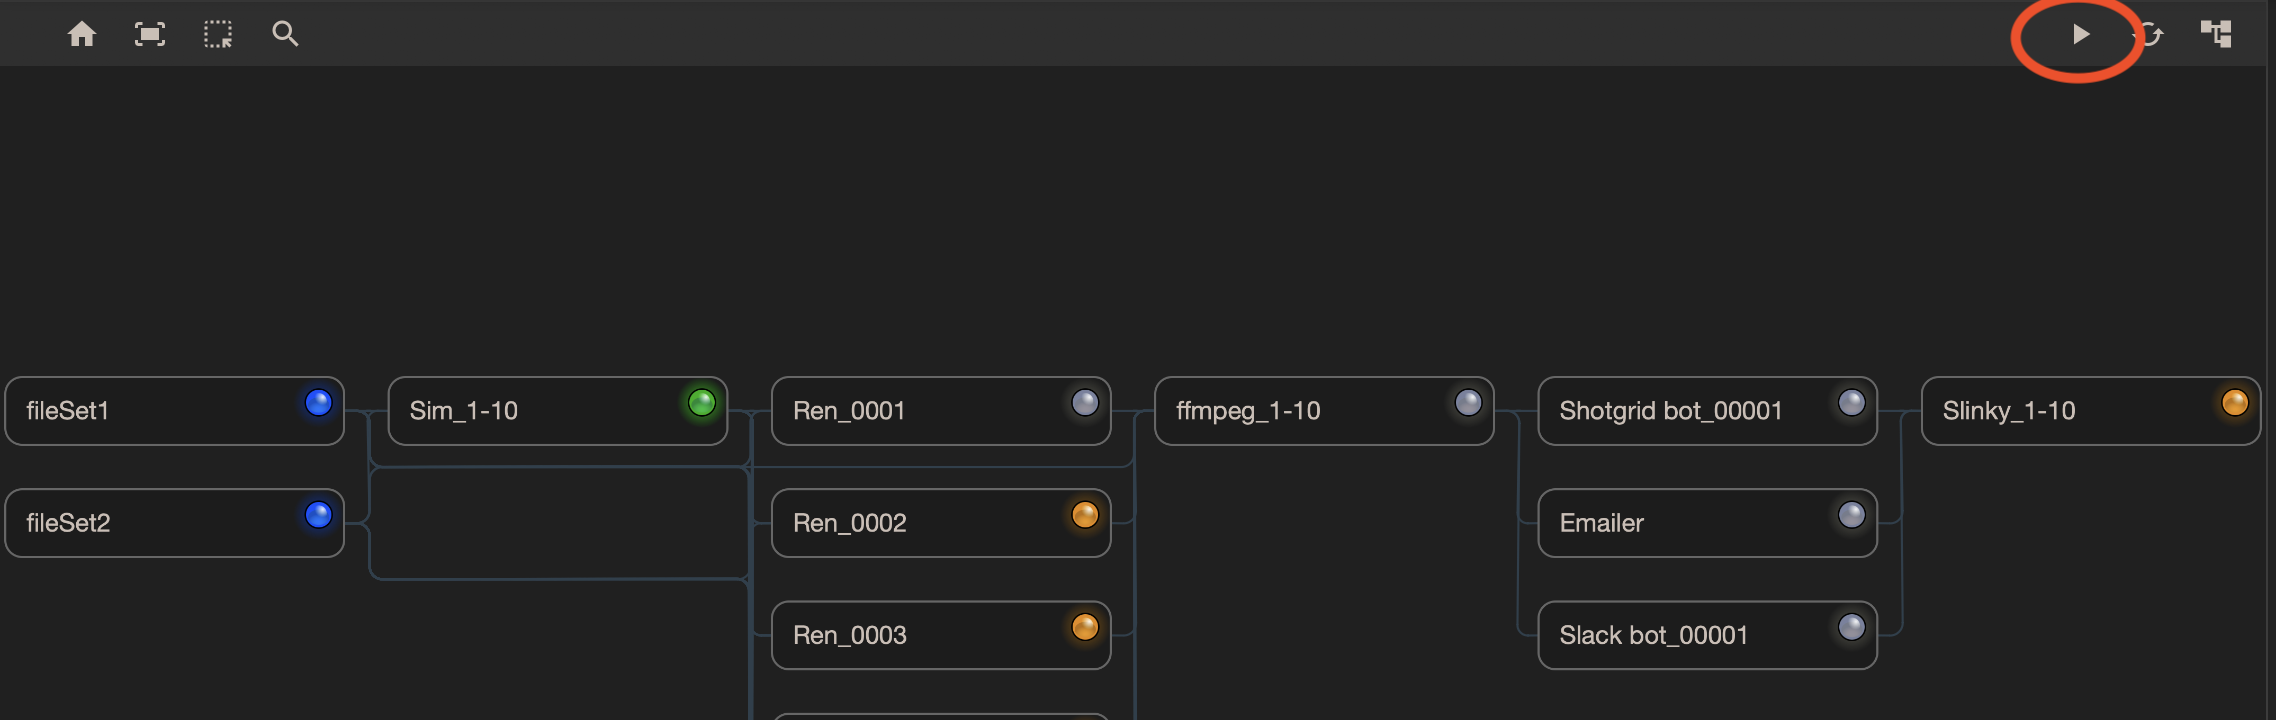
Simulate golden path
No nodes need to be selected to use this simulation feature.
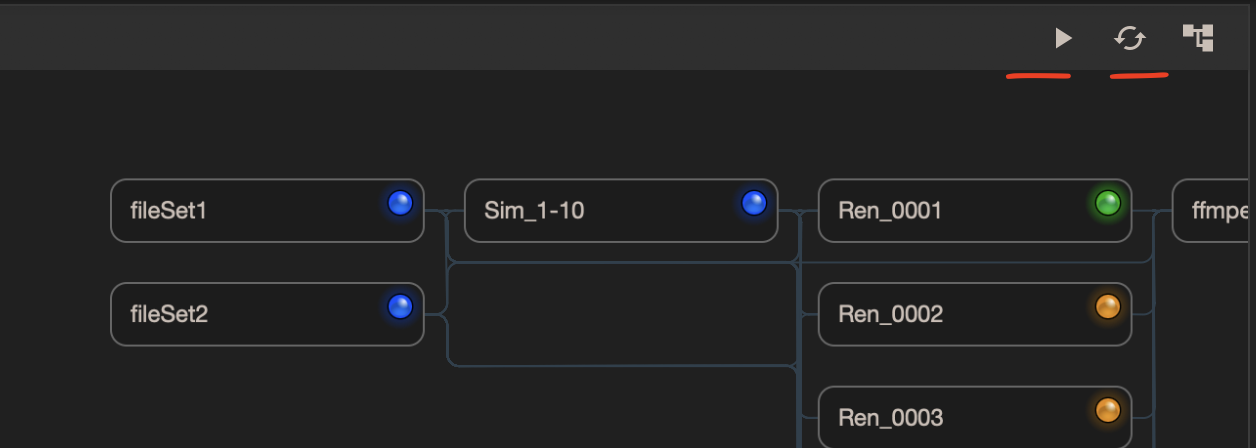
Clicking the play button in the graph view toolbar does the following:
- Sets any open node to running if it has either no upstream nodes or all upstream nodes have a ready status (skipped or succeeded).
- Sets any running node to succeeded.
In the screenshot, the simulate button was clicked 3 times. The first time it set the two fileSet nodes to running. The second time it set the running nodes to succeeded. The third time it set the open node, Sim-1-10, to running since both its upstream nodes have a ready status.
Actions menu
The actions menu is available from the node panel toolbar. It works on selected nodes. It contains 2 sections separated by a horizontal divider.
- The top section contains actions associated with manual transitions. These will be available to users in the release app.
- The bottom section contains actions associated with procedural transitions. They come in handy in conjunction with the simulate golden path feature. They are designed for developers working with the default example workflow and will not be available to users.
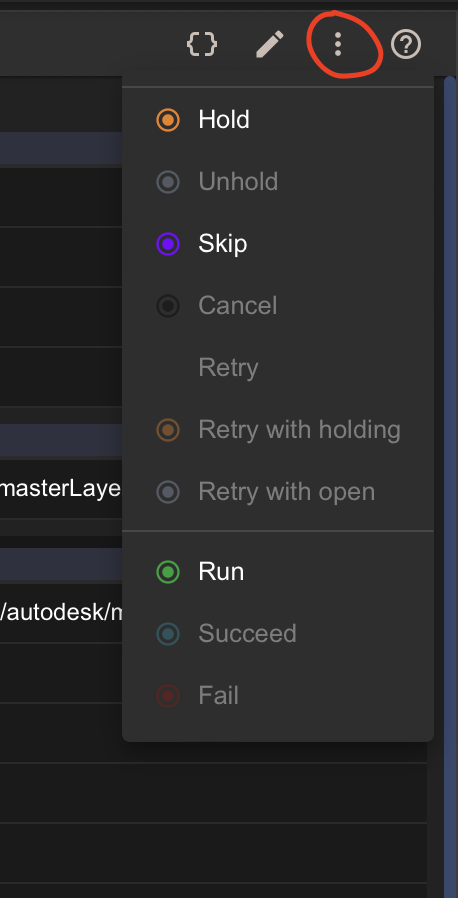
Each action is enabled if the transition is valid for the node's current status.
In the screeenshot, the selected node is open so Hold and Skip are enabled, since they are the only valid transitions. Run is also enabled for developers. See the Statuses and History document for more information.
In the release app, skip will likely be disabled for nodes in a start status (open or holding) since it breaks graph integrity.
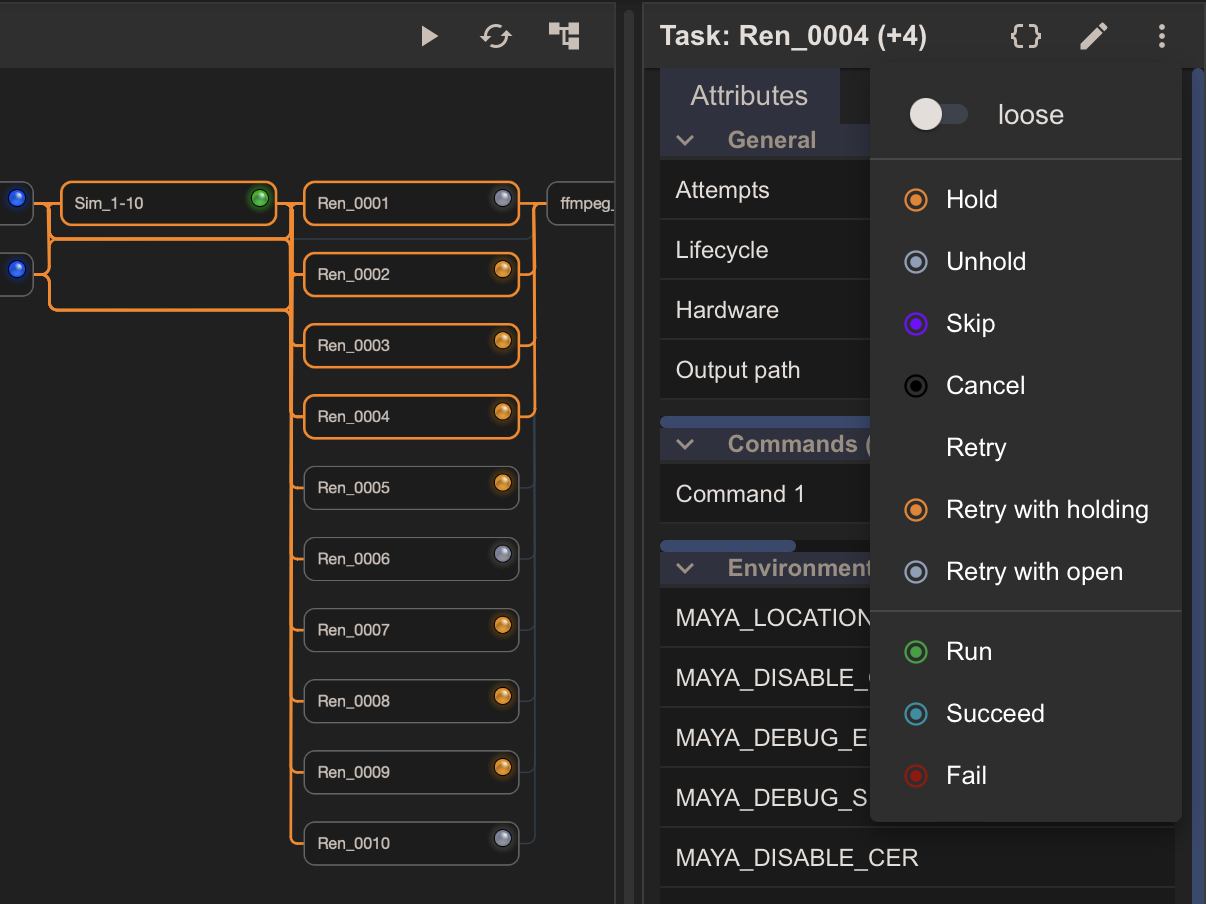
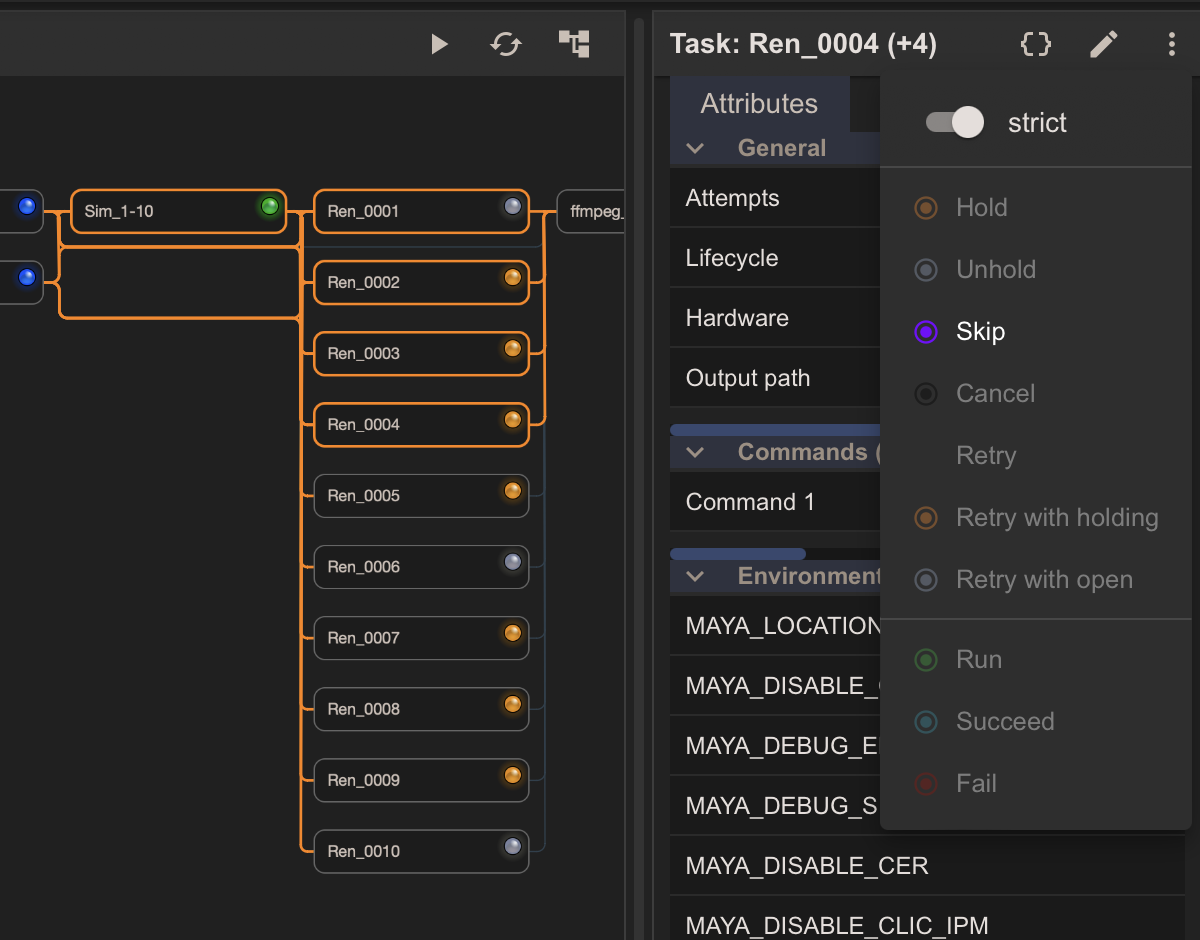
Loose and strict menu configuration.
This dev feature is available while we try to decide what should be enabled and disabled in the actions menu when multiple statuses are represented in the selection. The behavior is as follows:
- Loose: Actions that are valid for any of the selected nodes are enabled.
- Strict: Only actions that are valid for all selected nodes are enabled.
If only one status is represented in the selection, the loose/strict setting is not shown.
If in loose mode, an action is clicked that is not valid for some nodes, only compatible nodes are acted upon.
Loose mode:
Strict mode:
Retries
Now you have tools to simulate status transitions. Let's take a practical look at how retries work.
From a UX perspective, editing a node that has already started running indicates that you want to retry the node. There's no use case for editing and not retrying. Therefore we'll use the word retry to mean a retry with or without edits.
- Hit the reload button to reload the example graph, then press the simulate button 5 times. The graph statuses should look like the image below:
When you edit a node that has already started running we treat the current configuration as historically interesting and store it as a snapshot.
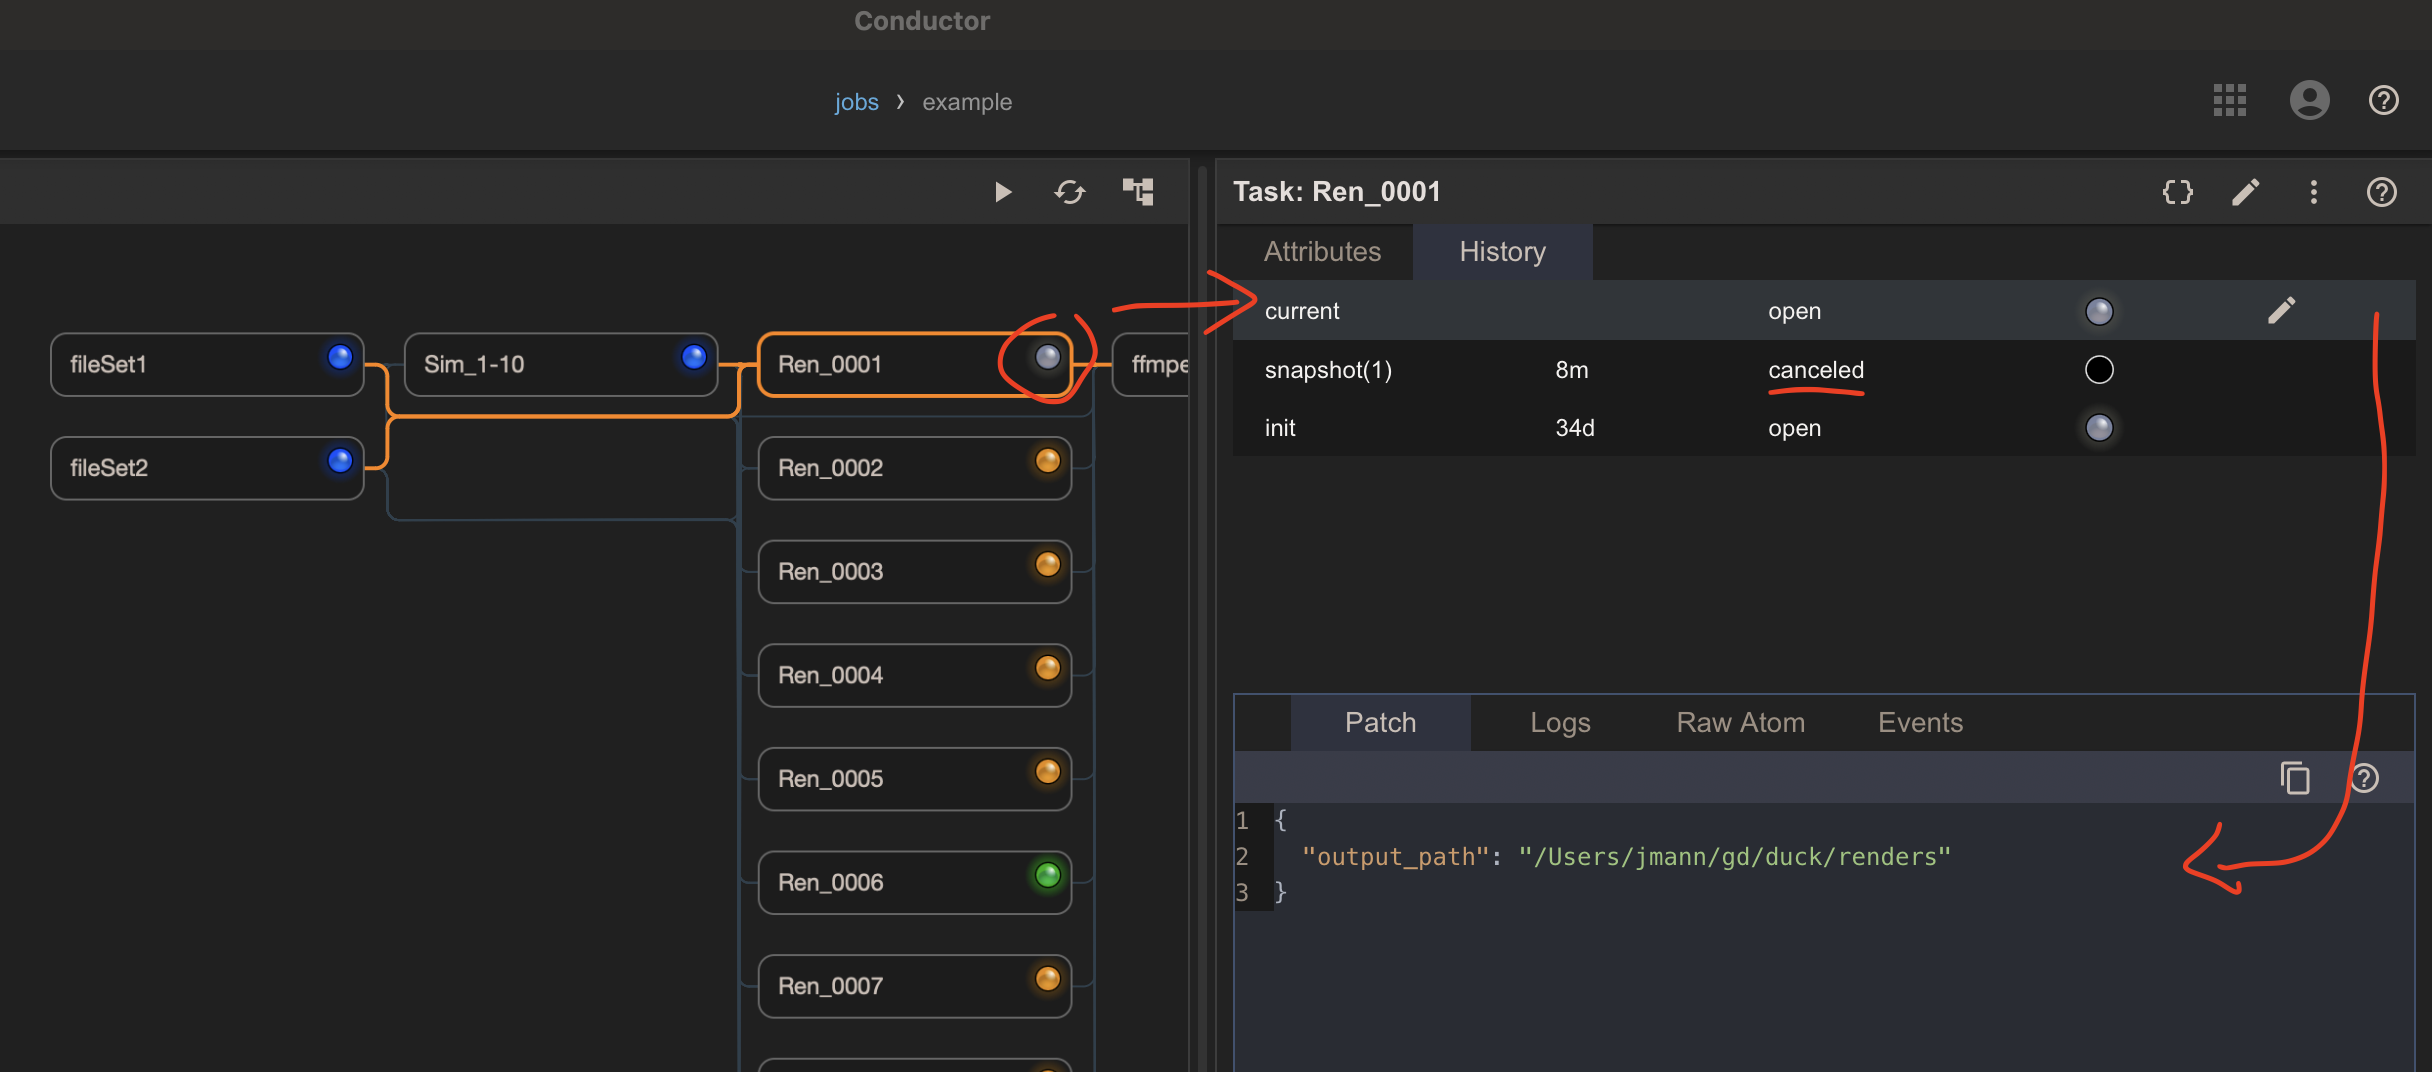
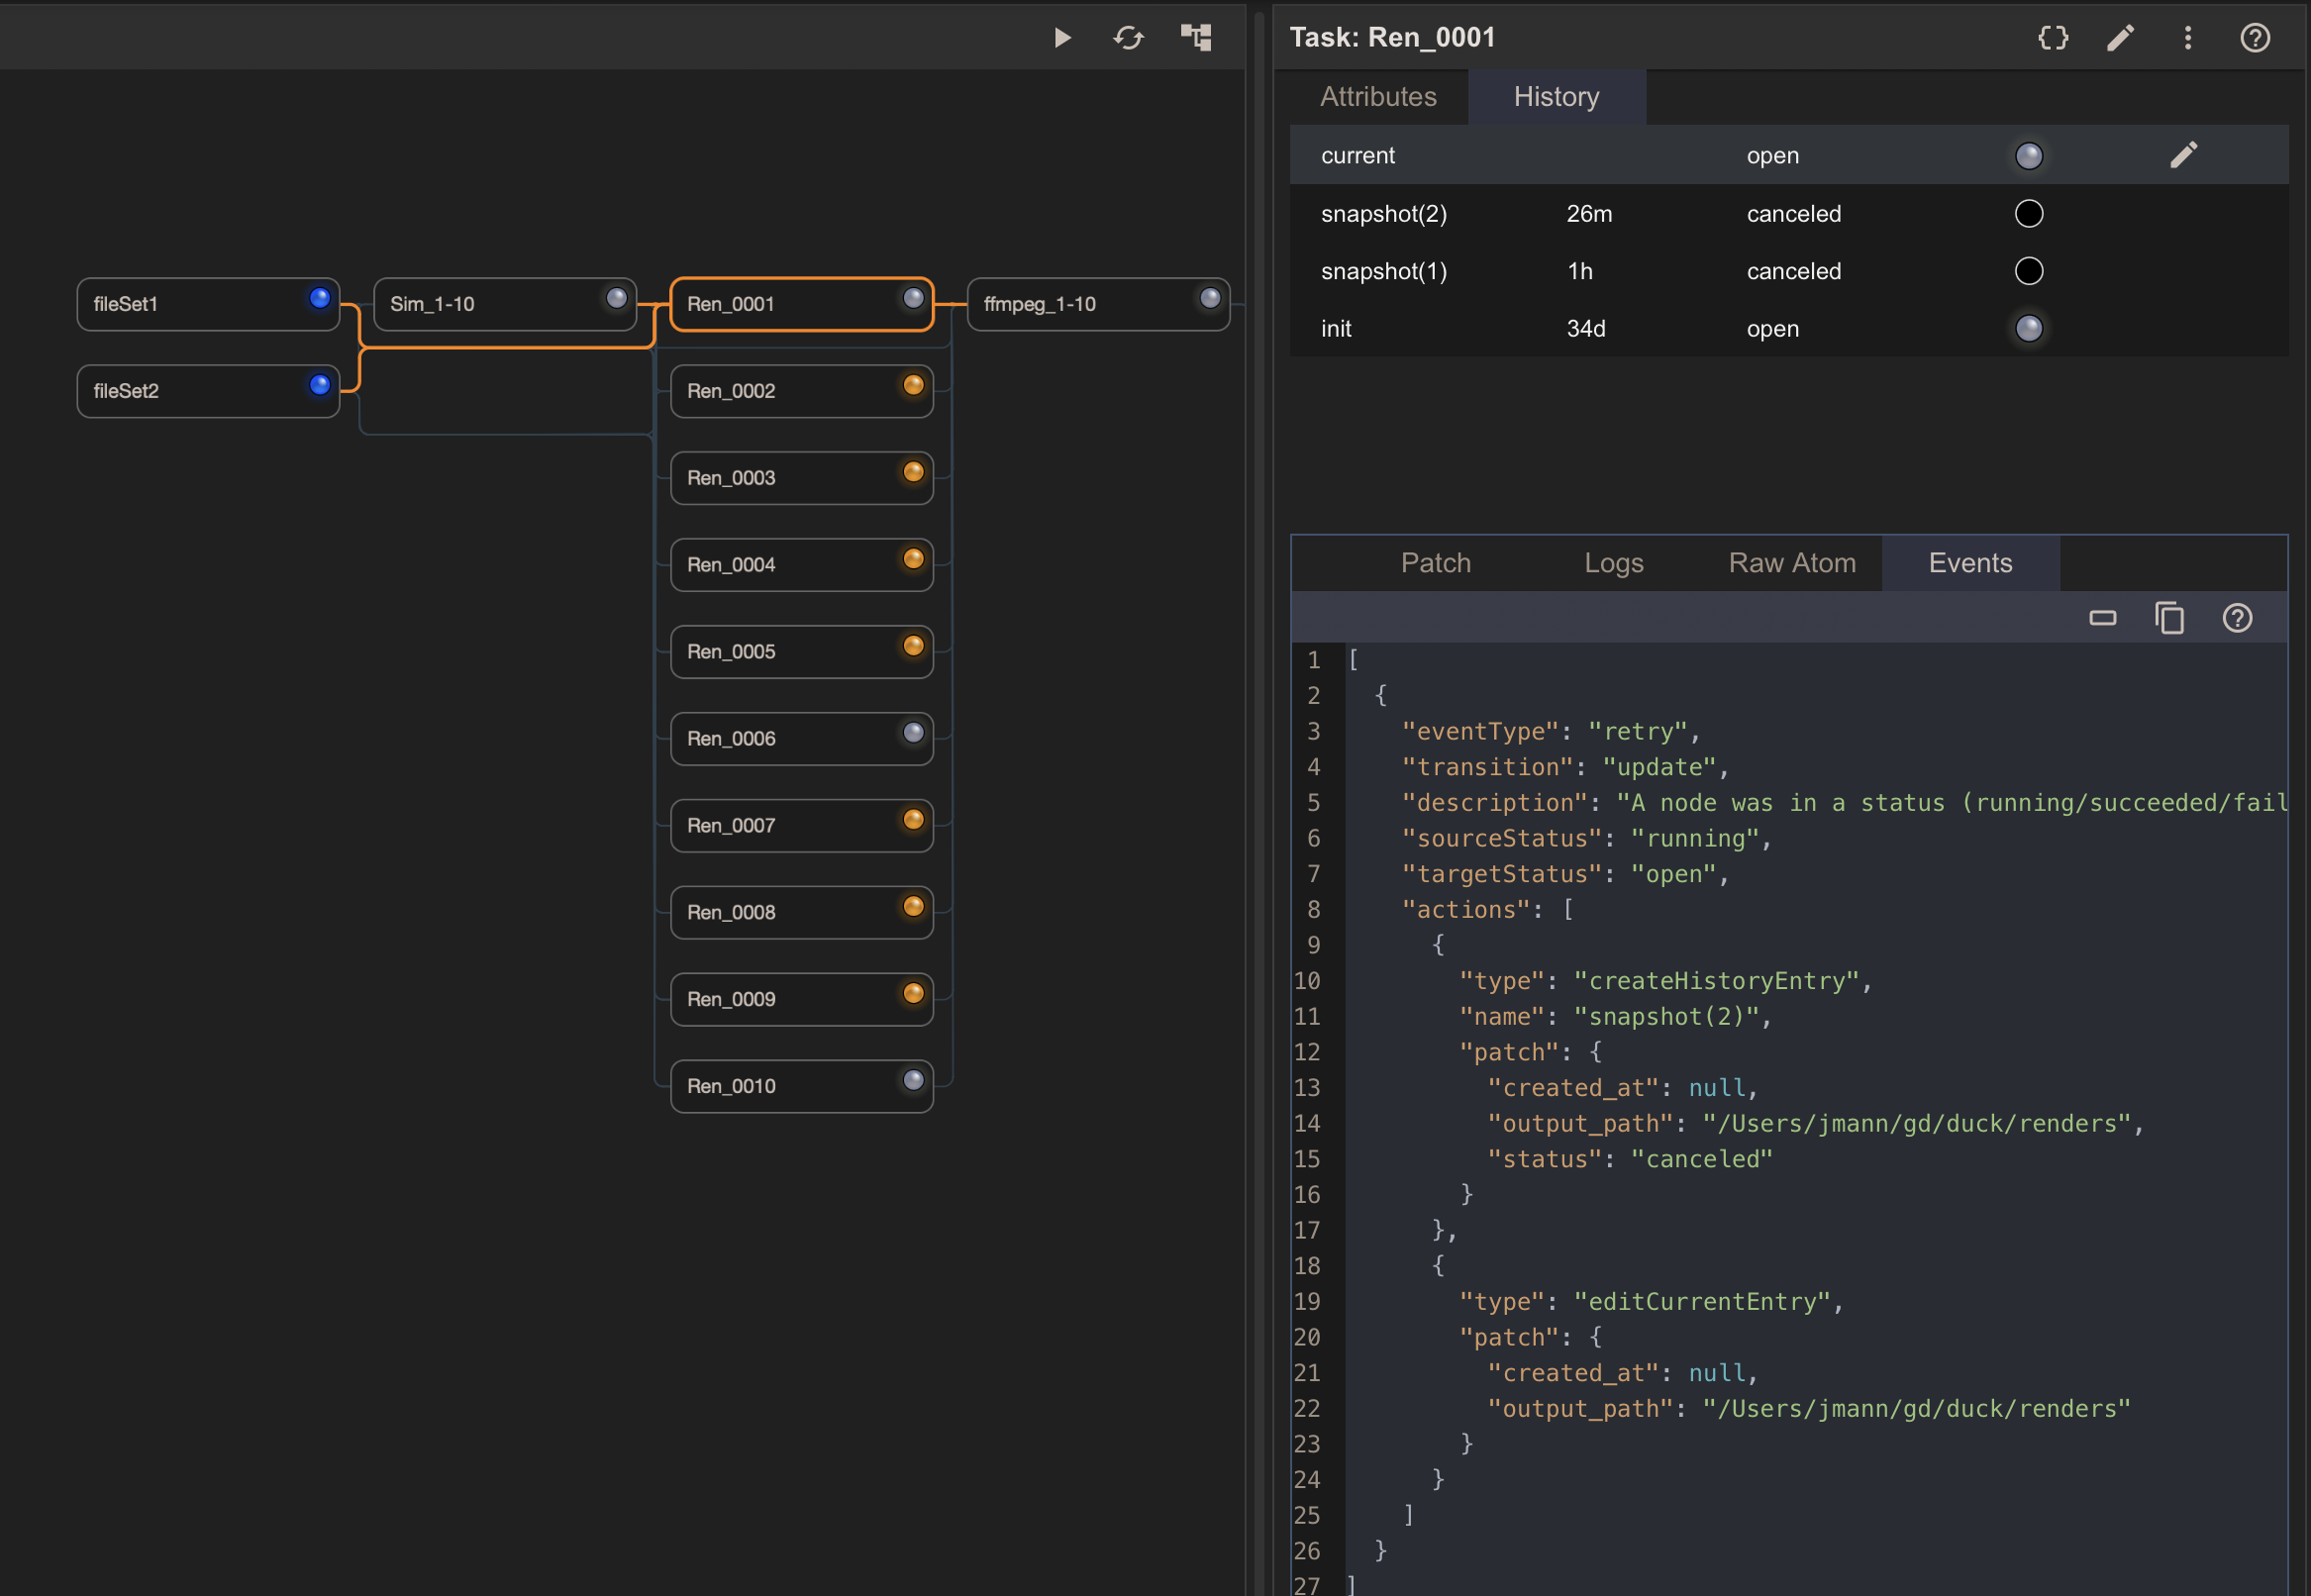
Retry a running node with edits
- Select Ren_0001 and click the pencil icon in the node panel title bar to open the Edit node dialog. Change a parameter, for example scroll down and change the Output path to
/path/to/my/renders, and click Save. - On the confirmation dialog that appears, click Update.
- Select the History tab in the node panel.
You should see that a new snapshot has been added between the init and current configurations.
A few points to notice:
- The status of the new snapshot is canceled. When a running node is retried, it must be canceled first.
- The patch for the new snapshot is empty, because the current patch when the node was running was empty.
- The new current configuration does contain the edited Output path parameter in its patch. Therefore, when the node runs again, it will use the new output path as intended.
- The new current configuration status is open, because that is the status of the node in its base (init) configuration. If we had used Retry with holding in the Edit node dialog instead, the new current configuration status would be holding.
- Now switch over to the Events tab in the bottom section of the history tab. You should see the most recent event displayed for the selected node.
The events displayed are simply a log of the information for each action in JSON format, designed to clarify the history. Nothing relies on them.
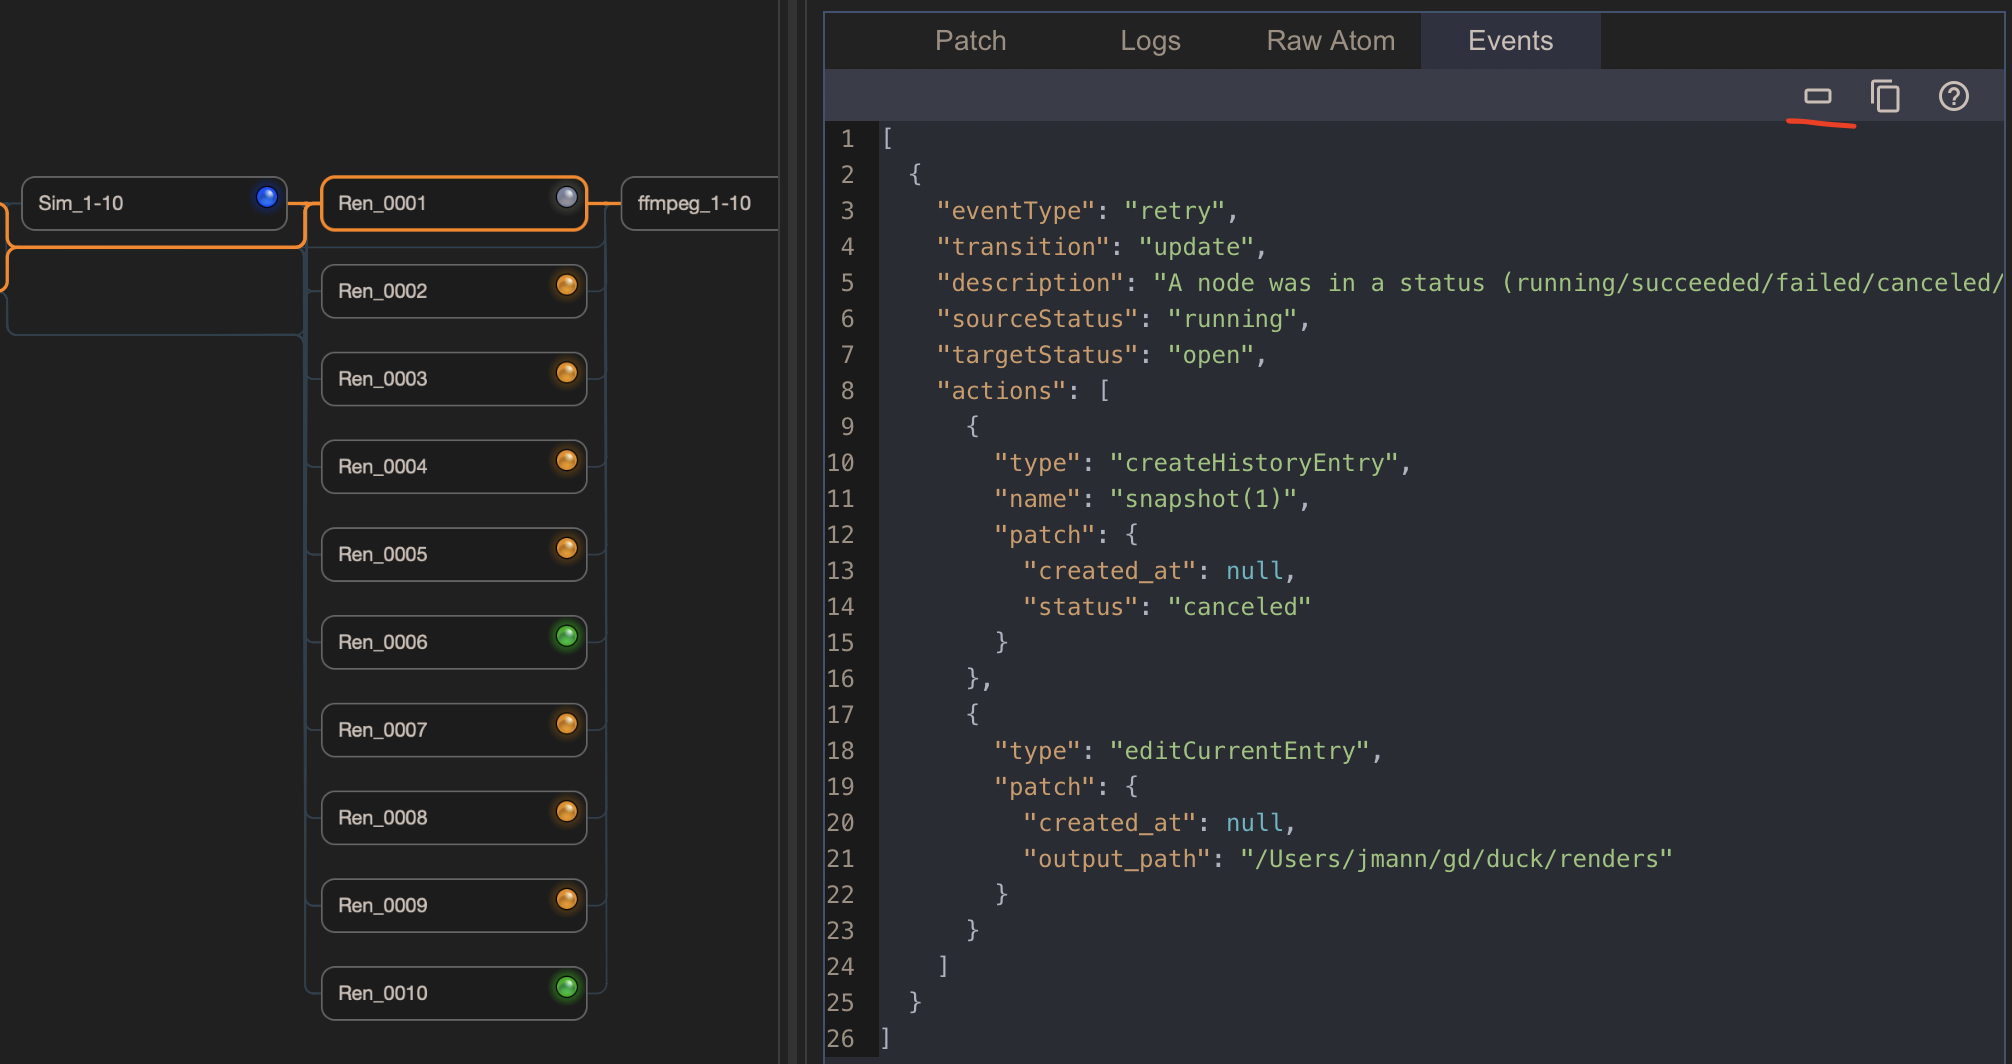
The small brick icon in the Events toolbar toggles between showing all events or just the last event.
Notice the actions property for the most recent event contains two actions:
- The snapshot of the current configuration.
- The new current configuration patch reflects the edit we made to the Output path parameter.
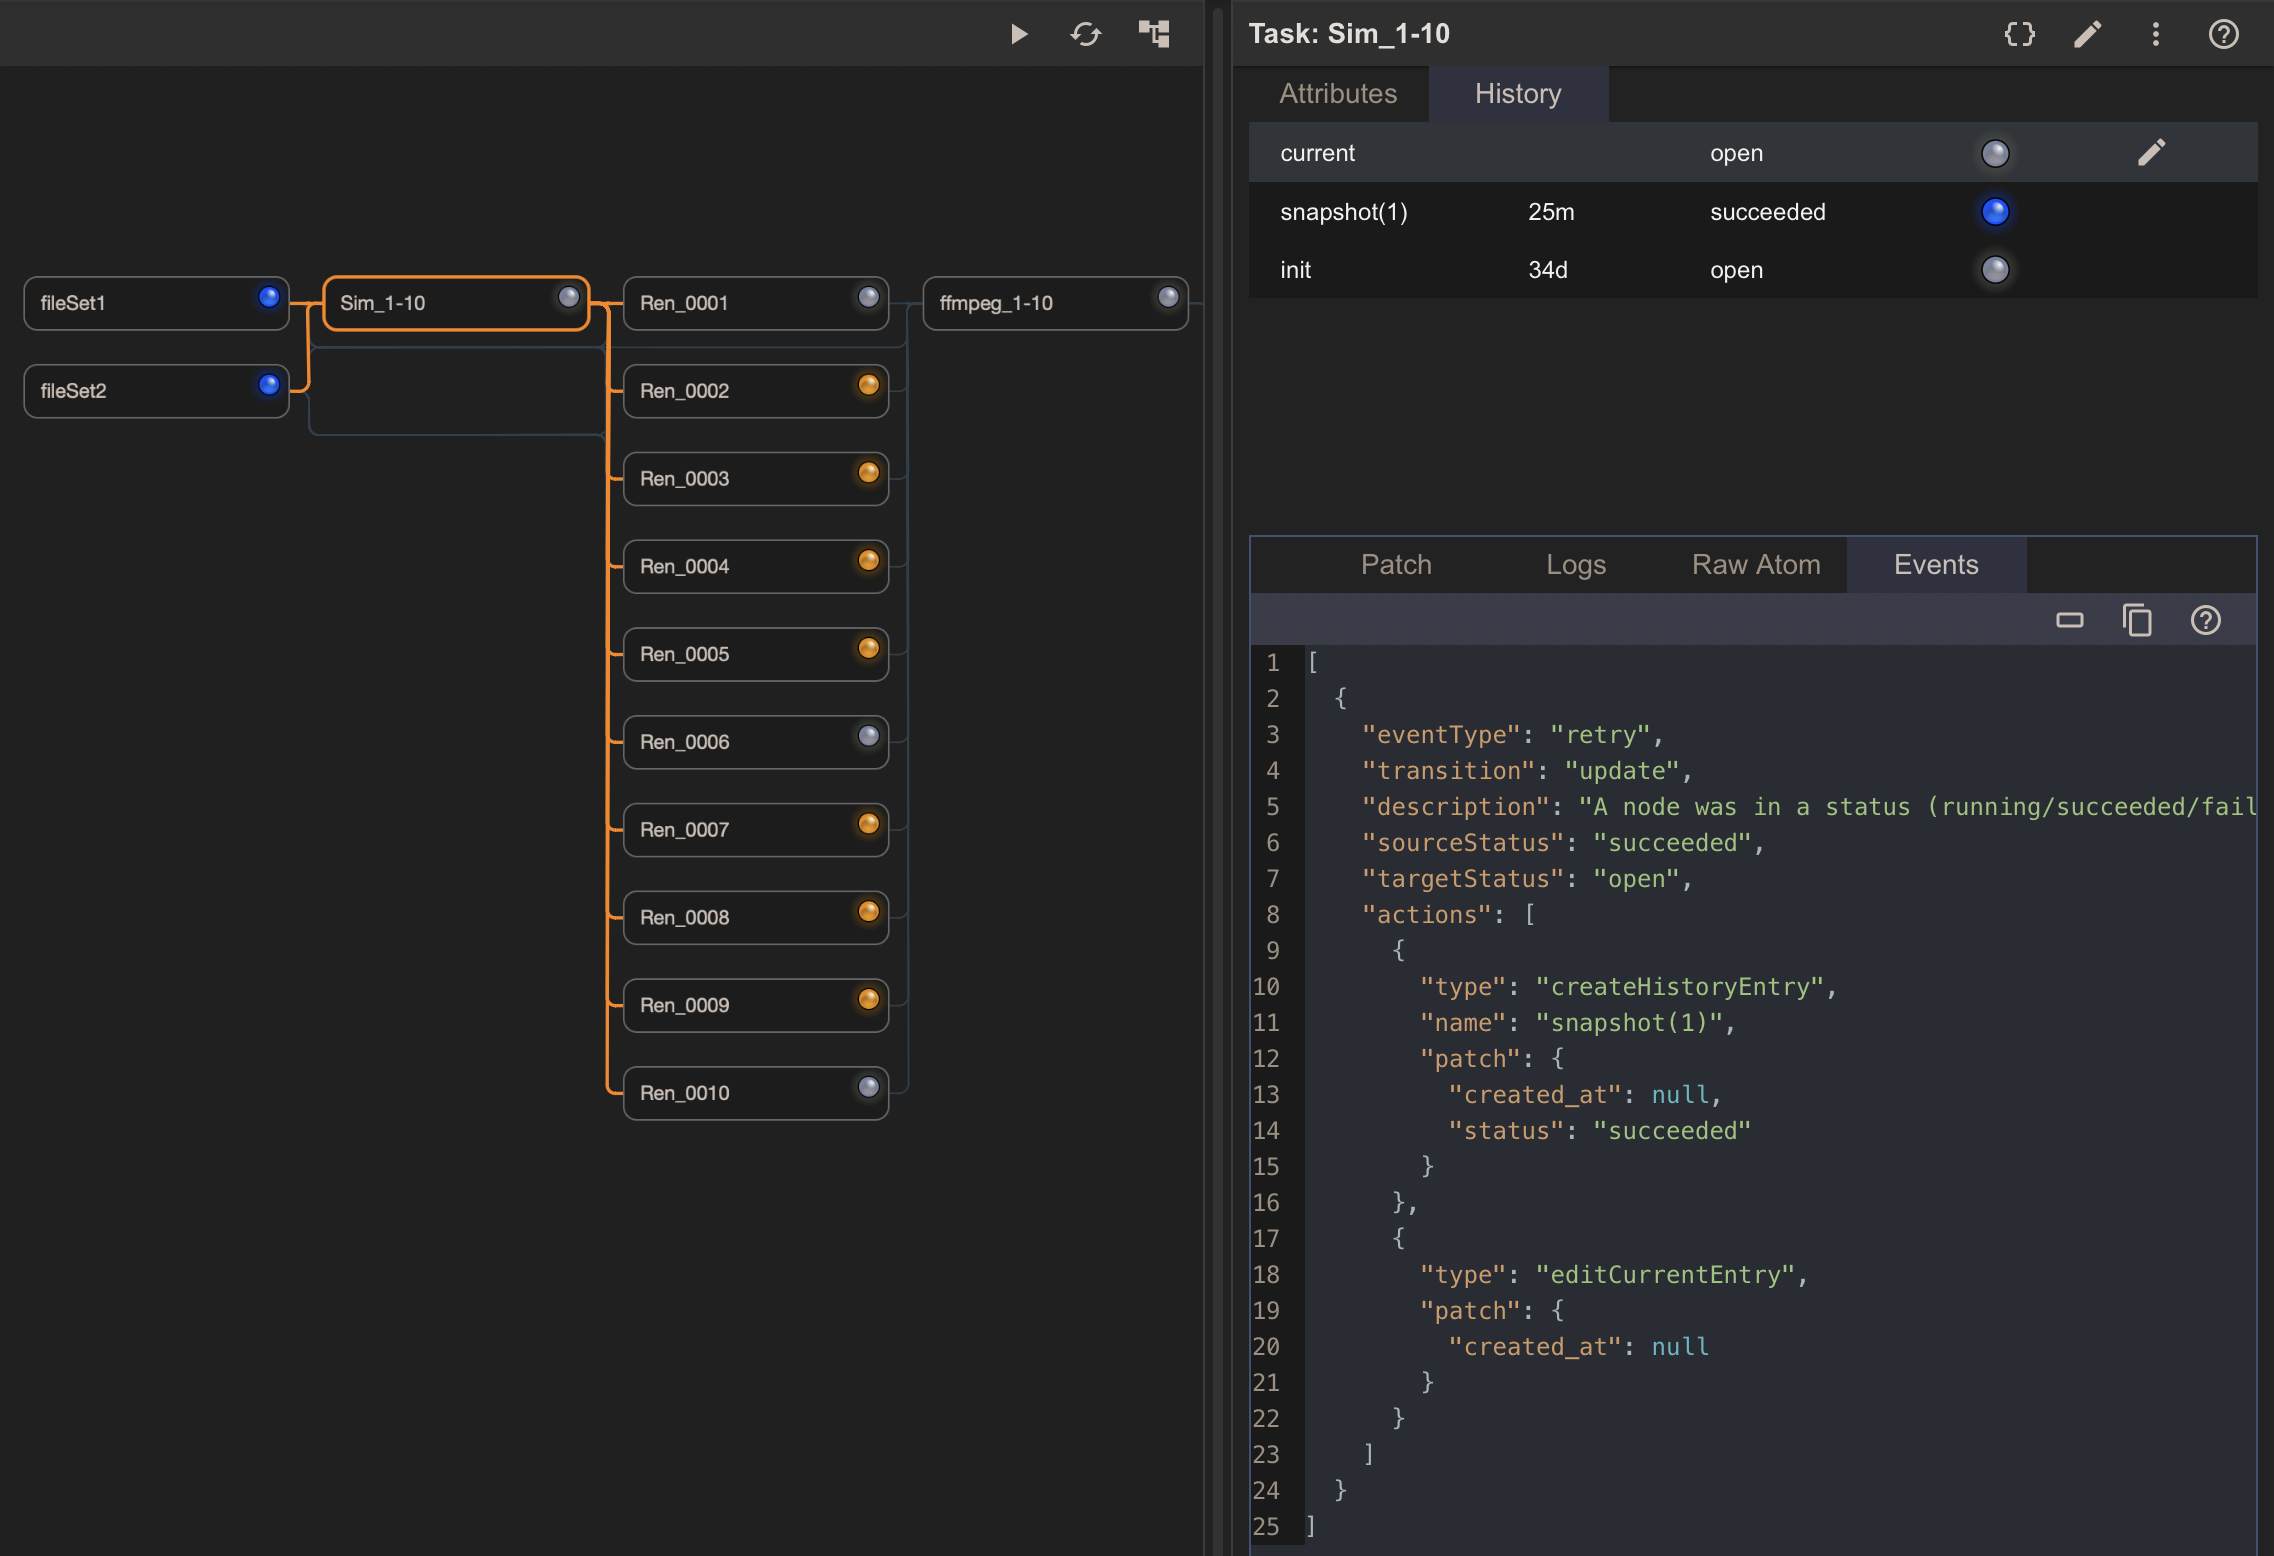
Retry a succeeded node with downstream running nodes
Let's see what happens if we retry a node that has reached it's final status.
- In preparation, click the Simulate button once to put Ren_0001 in a running status again.
- Select Sim-1-10.
- Open the Actions menu and click Retry.
This is funtionally the same as using the Edit node dialog without making any edits.
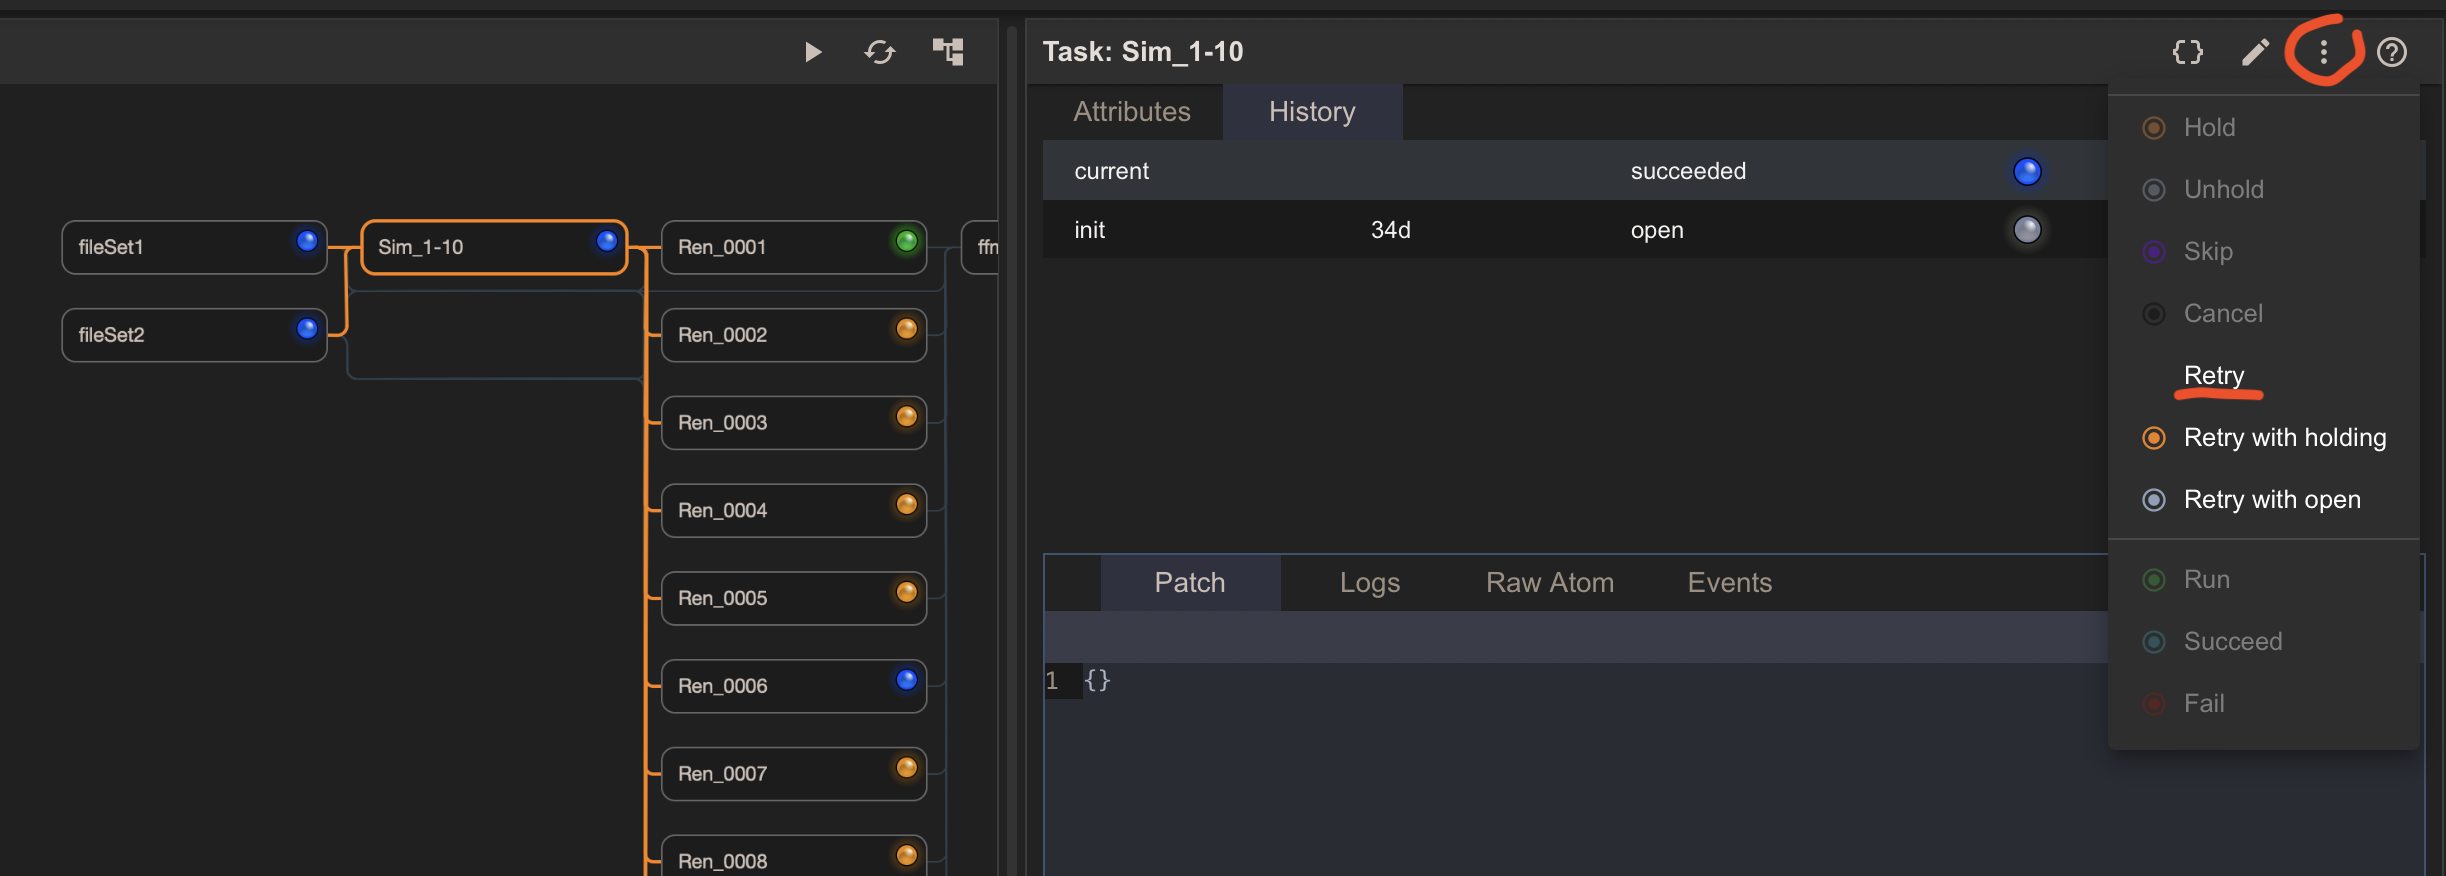
Once you click Retry, notice the following:
- The current (succeeded) configuration is stored as a snapshot.
- The snapshot status remains succeeded, because there was no need to cancel the node. The same would be true if the node had skipped, canceled, or failed status. Only a running node needs to be canceled before it can be retried.
- The downstream node, Ren-0001, which was running, is now open again. This is because retries cascade to downstream nodes that have started (or finished) running. Only open or holding nodes are unaffected by cascades.
Take some time to look at the History panels for both Sim-1-10 and Ren-0001. Check the patches and event logs. Notice how Ren-0001 now has a second canceled snapshot, which was created by the cascade.
Also take a look at the Raw Atom tab to see how the configurations and snapshots are stored in the app.
Conclusion
This concludes our practical introduction to working with nodes in the monitor view of the desktop app. We've covered the following topics:
- Multi select
- The Node Panel
- The Edit node dialog
- History
- Graph simulation
- Actions menu
- Retries
Along with the conceptual explanation in the Statuses and History document, you should now have a good mental model of how nodes and their history of configurations are represented in the app.
Some terminology is subject to change. We are very open to feedback on any aspect of this documentation.